Showing posts with label Our Home. Show all posts

11.19.2014

{ A Place For Everything }

I can still remember some of my childhood homes quite clearly. I can picture the backyards, the bedrooms, the common areas-especially the kitchen of our first house. I loved that house. I can remember almost exactly what was in each and every cupboard and drawer. I remember the lower cabinets where the cereal and the big white Tupperware container of sugar was kept. It was so cool because it was located on a peninsula and it could be accessed from cupboards on both sides. I knew where the baggies were kept for school lunches and the silverware drawer that was overflowing with lots of spoons and forks. I remember the cupboard above the microwave where the smaller Tupperware containers were and at the very top where my mom used to hide the Christmas candy we would use to decorate gingerbread houses.

It’s funny how time doesn’t diminish those things that have become familiar to us. My parents live in a house now that wasn’t one I grew up in. Every time I go visit I feel like I fumble around in the kitchen looking for what I need-not because it isn’t organized well or where it needs to be, but because it isn’t familiar to me. There is a lot of comfort in familiar. It helps a house feel more like a home when we can count on where things are. It makes it feel like ours. Those little memories of where the sugar bowl sat or that the good silverware was kept in the top drawer of the buffet in the dining room, has made me grateful for that time when that house and all around me were at the forefront of my mind, so much so that those memories still have a place there now.

My mom used to have a little saying that she would tell to us, “A place for everything, and everything in it’s place”. I don’t know at the time that I fully appreciated that wisdom of hers, but I sure do now. I love organizing. I love having a place for everything. I love carving out little spaces that become the familiar for my family.

We don’t always have the neatest house (we do have 10 people living here you know), but I do love it when it is organized. The hardest part for me is that we sometimes get lazy in keeping it organized, and often I have a hard time with others seeing my vision for how fantastic organized things can be. I’m sure they are just not fully appreciating my great wisdom that my mom passed onto me. Luckily, I have a few kids that see my vision and love to organize as much as I do, so they are my little cheerleaders when it comes to organizing our spaces.

One of the first little projects I did when we moved into our house 3 years ago, was pretty up some of my drawers in the kitchen and get them organized and super efficient.  It was fun to see who noticed first that I had organized the drawer. I must say that even if organizing isn’t everyone’s thing around here, most sure did notice it quickly. It made me see that they already were forming those familiar spaces in their hearts. It also gave me some hope for their future organizing endeavors-a girl can dream right?

It’s nice when the rest of the house is in complete chaos to open at least one drawer and see a nice tidy space. Wouldn’t it be nice to open that drawer and have the rest of the house be magically cleaned-now that’s a magic wand I want tucked into my Christmas stocking! This drawer in our island is one of the most used-beside our silverware drawer and the kids drawers where we keep the plastic bowls and cups. I knew that a space this used needed to be organized very well so that things could be found and put away easily. The kids help by unstacking the dishwasher quite frequently, so I wanted them to be able to find where things go quickly. If it takes too long, they won’t do it.

I lined the drawer with some gray and white chevron patterned vinyl that I found at TJ Maxx. I love that something extra that it adds to an otherwise ordinary drawer. I also love that it protects the drawers. You can see some spots in the picture below where part of the vinyl has worn from one of the plastic organizers shifting around. It makes me happy to know that that could be my drawer bottom all scuffed up-not the end of the world by any means, but it’s nice to keep the drawers looking as new as we can for as long as we can.

Kitchen Drawer Organization blog-1

I found some smaller turquoise containers in the dollar section of Target, and the clear ones in the bathroom section there too. I wanted some of the space where I could see the chevron pattern peaking through, and the clear containers were a perfect fit. I attached Velcro to the bottom of the organizers to keep them in place when the drawer is opened and closed. At first I had only used Velcro on the middle one, which stayed in place the best, and I tried using First Command Velcro strips on the bottom of the others. I love the First Command Velcro strips for other things, but they didn’t work great here. I ended up added some more Velcro to the other clear container and the top turquoise one. The other turquoise ones didn’t need it, as long as the top one was firmly in place.

Kitchen Drawer Organization blog-2

Kitchen Drawer Organization blog-3

The drawer holds our most used items-rolling pins, measuring cups, can opener, apple slicer, pizza cutter, and ice cream scoop. There was also a little more room for our cake decorating tips and plastic bags that we use to make gingerbread houses at Christmas. All of our other spatulas and bigger spoons are in pots near the stove for easy access while we cook.

Kitchen Drawer Organization blog-4

Kitchen Drawer Organization blog-9

Kitchen Drawer Organization blog-7

Kitchen Drawer Organization blog-5

Kitchen Drawer Organization blog-6

Kitchen Drawer Organization blog-8

I love being able to open this drawer and see all of our stuff nice and neat. I love having these things within arms reach, when I need them, and I don’t have to waste time searching around the kitchen for that lost item I wasn’t quite sure where I put last. I love that even Ryan can go to this drawer and get out the ice cream scoop or the pizza cutter when we ask him. He knows where it is… he knows the familiar.

I think back to when I was little and how I used our kitchen. I got my breakfast each morning from that same cereal cabinet. I climbed up to that Tupperware cupboard to sneak gingerbread house candy. I set the table nice with the fancy silverware and crystal glasses when we had company over. I used that kitchen, and that’s how I remembered and love it so much. There are days when I watch my own kids get out their bowls and spoons, find the cereal they love from the pantry, and have breakfast all on their own. They know where the things are that they need-the day to day routines are becoming the memories they will remember. It warms my heart to know that they are making this house a home filled with memories of the familiar.

5.02.2014

{ Our Playroom Makeover-Part 3 The Decorating }

In the series of things The Decorating came next, but in actuality after The Planning was under way, but before The Building even began, I had almost all of the things for the “decorating part” at least bought and they were being hid away in the attic and various other hiding spots throughout the house until Christmas. This was one of the funnest parts for me, and with the joys of online shopping it became so much easier.

I had drawn out a floor plan of the playroom and situated things how I thought they would work best. My idea was to create two separate areas-a “big kid” area and a “little kid” area. I was going to use two couches in the shape of an “L” along with a side table and sofa table to separate the areas. That “big kid” area would be where the TV is and a place for my older children to be able to have friends over to hang out and watch movies or play Wii. The “little kid” area would be the area under the two lofts where the play kitchen would be and a new dollhouse that I was making. There would be floor space there to get out toys from the toy closet and play. The two lofts would become space for big and little kids alike, but I had a feeling that Brooke, Erika, and Abby would claim one as the “Girls Loft”, and give Scott and Ryan the other loft for a “Boy’s Loft”. The built in desk area would serve for both coloring as well as working on the laptop doing homework.

This is the plan that I had originally came up with and served for a good starting point for me as I shopped for items. I wanted a nice neutral base with fun pops of color throughout it. I wanted it to look nice, but definitely kid friendly. I needed finishes that would take some abuse, items that would be functionally for storage, and be a place where my kids would feel at home. Here are some of my thoughts as I went through that process-hopefully I can come back and read this next time I do a room so I can see where I made some good purchases and where I should look for items.

image

I painted the walls a light gray color-and this part alone became a huge thorn in my side. All grays are not equal, and I knew that full well going into it. I had gotten a dozen different samples and painted them on large pieces of poster board and on the wall, and still didn’t get it right the first time. Light is a crazy thing, and I found out that in a room with such high ceilings  that the color looked different at the bottom than it did on the top part of the wall. Not to mention different on all four walls, and at different times of the day. The color that I finally went with (after I had already painted the entire room another color) was Benjamin Moore Wickham Gray color matched in Sherwin Williams paint. In one of the pictures from The Building post you can see where it meets the ceiling where we hadn’t cut in yet and see how yellow the previous color looked.

In my first plan I had thought that we would do a couch and a loveseat in there, but when I measured it out we had room for two couches and it gave us more seating. I looked at a few couches that I liked, but in the end decided on the Ektorp sofa from IKEA. I have struggled getting this couch for a LONG time, even before this playroom makeover ever was. I would try to find reviews online of what people thought, and it was a mixed pot for sure. Some loved it, some hated it. I had sat on it before and thought it was comfortable enough, and for us the price was right. Those Pottery Barn ones sure looked tempting, but at a third of the cost, the Ektorp was just too good to pass up. The other plus was that a new slip cover only runs me $50, so if the kids ruin it, it’s very affordable to replace. The Pottery Barn slipcovers cost almost as much as the IKEA couch. I needed to have a couch that would get a lot of abuse since it was mostly a kids area, and I wanted to not have to worry that they would be ruining a super expensive couch or slipcover. Many people that have come over have commented on why in the world I would get a white couch with so many kids. My answer-bleach and Oxiclean. These slipcovers are easy to throw in the wash and bleach and back to knew again. We have had them on since Christmas and they are just now starting to show some dirt so I think we are due for a wash. Every 4 months is not bad in my book. Also, we have a no food upstairs rule, which I know the kids break often since I am finding wrappers and crumbs up there, but overall there isn’t all the sticky fingers that we have down in the kitchen. With our front room couch I have to stay leather, but I felt like I could get away with at least washable slipcovers up there where I can somewhat stop the messy hands from getting up there. So far it has worked out pretty good.

image

Comfort wise I have been super happy with them. They aren’t the sink in type you would get with the Pottery Barn ones, but they are cozy. The seats are just firm enough that you feel like you don’t sink in so far you can’t get out, and the back cushions are really soft but don’t seem to lose their shape. I wondered why I had waited so long to make this purchase because they really are great. My only complaint would be that the white fabric seems to gather lint like crazy. I feel like I am always wanting to run a lint roller over it to get all the dust off. It was something I hadn’t anticipated, but definitely not a deal breaker for me. In October IKEA was running a sale for their IKEA Family members (a free program) so we ended up getting them for even cheaper. I drove the 2 hours up to Atlanta one Saturday and brought them both back in the van. We unloaded the huge boxes into our bedroom where they stayed under blankets until Mitch came at Thanksgiving to help us carry them upstairs.

Finding a sofa table to go behind one of the couches was next on my list. I was going to use a side table that we already had from downstairs that was a similar color to the media cabinet. I thought it would help carry the dark color to the other side of the room, and I already had it so for now it will work fine. For the other furniture in the room though I wanted to mix in some other wood tones. There was already a lot of white in there so even though I love white I stayed away from placing a white table backed right up to the white couch. Too much white. I finally had narrowed it down to these five:

I loved the color and texture of this one, but it felt a bit too adult for the space. I think something a bit more casual would fit our style and the room.

image

Benjamin Distressed Wood Console

I liked the more rustic/industrial feel of this one. It was simple and the wood was a lighter tone than the cabinet so that was good, but in the end I wasn’t that impressed with the reviews and pictures of it online.

image

Safavieh Dennis Console Table

This one was my favorite for awhile, but unfortunately was only sold in the UK, so getting it here was a major cost. I loved the lighter wood and the criss cross wood on the sides of it.

image

Occa Oak Savoy Console table

I decided that since the walls were a really light gray maybe I should be looking for something along those lines instead. I found this one that looked okay, but still just not exactly what I had in my head. I wanted something that had a bit more texture/wood feel to it, not just a painted piece.

image

Threshold Windham Console Table

I ended up finding this one and fell in love with it. Then I tried to find where to get it since it was sold out on the site that I had originally found it. After searching for several days I finally found it on wayfair.com and with free shipping. I loved the middle legs that separated the space a bit since I was planning on putting some baskets down there, and I loved the gray tones to it, but with still some wood texture. When it arrived it looked a bit different from the picture, but has ended up working great. It looks a little more brown toned instead of gray which I was initially disappointed about, but I loved the shape of it so well that I decided to keep it. When we got the whole room put together it looked great. The slight brown tone with the color of the TV cabinet and other furniture ended up being a perfect blend. The quality of the table itself it great, but the color is more of a painted surface glaze than a gray stain so it seems to show marks kind of easy on the top. Overall I am happy with it.

image

Bridgeport Console Table

My plan was to put a rug in front of the couches over in the TV area, just to unify the area more and bring in a little bit of pattern. I was really set on this chevron striped rug from Pottery Barn Kids, but when I went to see it in person the stripes were very cream colored instead of white. It was really just not what I had thought it would be. Note to self for the future-it’s worth it to go see something in person if at all possible before purchasing.

image

Chevron Wool Rug

I found this one at Rugsusa.com that was similar, and even though the gray color was a lot darker than I had planned I thought it would still look great, and actually might be nice to equal out all of the white in the room. It turned out matching the other hopscotch rug almost perfectly. The white chevron stripes in this one were still a bit cream colored, but not nearly as cream as the PBKids one. They had a killer Veterans day sale so I scored if for super cheap, with free shipping!

image

Rugs USA Quinta Indoor Outdoor Chevron Charcoal Rug

I found this rug from CB2 and just fell in love with it. It made the space seem so playful and definitely added the touch of fun that I wanted . I used a coupon, but in the end it was a splurge for the room. I figured I had saved a bunch in the couches with them being on sale that it was still in my budget.

image

Hopscotch Rug

I wanted a vintage type stool for the built in desk area, but was having a hard time finding one that wasn’t crazy expensive and was the right height. I ended up buying a chair that was totally different, hoping it would give a little modern edge to the room, but when we got it, I hated it. It wasn’t comfortable at all, and the metal bottom just looked kind of cheap-so back it went. It was missing the hardware to put it together, so since it was their fault, they shipped it back for 1/2 price. Yeah! I was glad that I had started shopping really early for things so that I had time to return things if I needed to and also avoided the holidays shipping rush.image

Wildon Home ® Hebron Adjustable Swivel Bar Stool

I thought I had looked everywhere, but while searching on worldmarket.com I came across just the stool that I had in mind. It looked sort of industrial/vintage and I thought it would work really great for a teen hangout. I caught it on a REALLY good furniture sale that they had and got free shipping again! Love free shipping! When it arrived I was shocked at how awesome this stool is. It is SO heavy, and the finish is more of a metal colored not just painted black. The top wood is also not shiny like it looks, but a great light weathered look and really heavy duty. I LOVE it! I am actually thinking of replacing our faux leather stools in the kitchen that have started to peel with these. The seat spins so it can be adjusted to the perfect height. It was funny to me that this is what I had in mind for the space, and I tried to go with other things, but in the end my gut was right and it is almost my most favorite piece in the room.

image

Twist Swivel Stool

I had seen these little kid wing back chairs on this blog-Natasha Smith Photography and thought that they would look so cute in the space. When I looked for them on Amazon they only had this light gray color, but I ordered them anyways hoping that they were the right ones. They were the darker gray like on the other blog, and were super cute, but I  didn’t love them. I held onto them while looking for something else, but some things that I didn’t like was that 1-they looked a little to serious for the space. Maybe for a cute reading spot in a library nook? and 2-the color looked a little too blue to me instead of dark gray.

image

I got a magazine one day form Home Decorations Collection and they had these cute kids chairs. They had a few colors and one was a dark gray color. I don’t know why the color online makes it look brown, but in the magazine it was definitely gray. They were having a sale (I love sales) and it ended up being not that much more than the ones that I had originally bought. Since the first ones had the color misadvertised they let me send them back for free! Yeah! When these chairs arrived, I was so impressed with the quality. I liked that the cushions could be turned over (something the first chairs couldn’t do), and the feet were real wood not plastic like the other ones. And the fabric at amazing-it is heavy duty and has an almost linen texture to it. I wished they had bigger ones for me-they are so cute! The simply shape works so much better in the space.

Kids Mirage Chair

image

Jody Kid's Chair

The Moroccan poufs were the one thing that I thought would bring a great deal of color to the space, and a place to prop our feet since I wasn’t going to have a coffee table up there. The problem is that they are CRAZY expensive in my book. I looked everywhere for them, but for four of them it was going to break my budget. I looked into sewing them, but in the end just couldn’t make it work. I am in love with the bright pink and blue one, but one crazy thought that I had since they are real leather and dyed was that I worried about the colors bleeding onto my rug up there. I wonder if that is a problem with them. I ended up going with some other colorful floor pillows, and maybe in the future I will splurge and get one of the poufs-they just look so pretty.

image 

The chalkboard word find I ended up making from a tutorial here:Thistlewood Farms-Chalkboard Word Find.

image

A lot of the other items where pillows from various places, wall art, and some great accessories. I used the 9 cubby white bookshelf to make a new dollhouse of sorts for their old dollhouse furniture, and my plan was to paint our pink play kitchen set white. My little boys play with it a lot more now than the three girls do so I wanted it to be a bit more masculine, but I just ran out of time, so it’s still pink as of now. Hopefully as the weather warms up consistently I can get out in the garage and spray paint it one afternoon.

I mentioned before in my planning for the playroom that I had figured out the “Right Way” to decorate. The “Right Way” for me was this-to make out a very detailed plan to start from. No matter what the space is or how big or small my budget is-MAKE A PLAN. In the past I will see something that I think might look nice in a certain room or I think I like it but don’t have a specific place in mind and what I end up with is just a bunch of stuff that doesn’t really blend together very well. There has been those occasions when I find something I just love and know I will find a place for-but for me those times are much fewer. I need a plan of what colors will work and what specific furniture I might need or not need. From there it has been so much easier for me to stay focused on the whole picture. Using an idea board like I did for this space let me see all of the possible items together and how they may look. It’s easy to swap out a picture or two and switch around different colors schemes instead of having to buy and return multiple items.

On Christmas Eve as we were pulling things out of the attic and finally getting to place them in the actual playroom, it felt so good to see that my vision for the room was finally coming together. It turned out fun and playful-and I just hoped the kids would love it as much as I did and get to enjoy making many happy family memories there.

4.30.2014

{ Our Playroom Makeover-Part 2 The Building }

After all of The Planning, I was ready to get started building on these lofts. I had draw out the plans, including exactly how much wood I would need for each step of the way and had purchased the first amount of wood. My brother Mitch was going to be here visiting for Thanksgiving weekend so my goal was to have the lofts rough box shape attached to the walls by the time he left. That gave us about 3 day to work on it. I did an awful lot of research on how to build these lofts. After looking at multiple plans and about a thousand pictures of different styles of railings and stairs and the ceilings for underneath, I came up with a set of plans that would be best for us. In the end I am not sure it’s the “right way”, but it seemed to be an engineeringly sound way, a way that gave it the best amount of safety you could have for a loft, and was the way that we intended it to look aesthetically. I was a little frustrated when I was looking for plans at the lack of detailed instructions on how to go about this, so I decided that I better write down the way that I did it, so if I ever what to try to attempt this again I will have some detailed instructions to remind me.

We started by officially closing down the playroom. When the kids all came home from school one day, the playroom was officially closed until Christmas. We put up wrapping paper covering the French doors on both sides of the door and then hung a sheet for extra protection from any little kid sized invaders. They were super curious but didn’t peek. We had moved the TV out to the hallway media area just outside the door so they wouldn’t have to miss out on all our Christmas time movies, and were in earshot as I would be working some days. We would rotate out the toys to play with in the hallway area, and then they would knock when they wanted more. It’s funny how after a month of doing that  it became such a smooth working system you would of thought that’s how it was always done. It’s makes me laugh now to have been a fly on the wall watching all that craziness.

Materials for Step 1

4-2x8 8ft in length

2-2x8 12ft in length cut in half for a total of four pieces

6-2x4 10ft in length cut in half for a total of 12 pieces that would go inside of the outer “box” we made

1 box (100 count)-4inch lag bolts to attach 2x8’s and 2x4’s together and attach the loft to the wall. We used 64 total for this step for both lofts-8 for the corners and 24 for attaching the 2x4’s.

Step 1-Building the loft base

For the first part of this project I started by attaching together the 2x8’s to make a basic box shape. I used two lag bolts per corner to attach them together. After I had finished one of the boxes I realized a mistake I had already made. I knew that I wanted to add some trim around the outer edges later (you can see it on one of the later pictures), but I had not countersunk the screws so that the trim would lay flat on it. I tried to unscrew them, but they were in too tight. The ones that would eventually be facing the wall wouldn’t be a problem, but the outer two sides I would have to adjust on the trim later to make it fit.

Playroom Building-2

When I made the second box I made sure that I used a large 1inch paddle bit to drill a countersunk hole first that went down just enough for the head of the lag screw to be flush with the wood, and then used a regular sized bit to drill all of the way through the rest of the wood. After I had both boxes assembled I was ready to fit the 2x4’s inside of the box to give it more support. I had planned for there to be six supports in each box. As I researched what a normal spacing of floor joists were, and how big our lofts were, six seamed to be a good amount. I’m sure by some standards it was overkill-I think many things we ended up doing were, but we didn’t want to take any chances of it not being sturdy enough to hold a good amount of weight. I used the same 4inch bolts to attach the 2x4’s to the main frame. My brother asked why I didn’t just use wood screws to attach these. On some plans that I had found they had all used the bolts for the main frame and the 2x4’s as well. I basically just went with their plans and figured extra strength was probably not a bad thing. It was more expensive for the lag bolts as opposed to just wood screws, but for a project this big it was small change to pay for safety.I finished up almost all of this part of the building by Wednesday night, and then our drill burnt out. It was one that we had had for almost 10 years so it had gotten some good use, but we were left with no tools to use all of Thanksgiving the next day. It was probably for the better-we were able to just spend a whole day relaxing and talking and eating.

The kids think it’s funny in the picture above that Aaron is just watching me do all the work. Truth be told I LOVE doing all the work. I don’t get too much time to do anything that “hobbylike” for me, so when I have a chance to I get a little bossy and stingy with the work. It really is so relaxing for me to create things, and I love just having Aaron there to keep me company though he claims that I never let him watch me do anything. He may be partly right =) He and Mitch just let me do my thing, and helped with their muscle power when I needed it. In the end we were all super glad that we were all there-there was something that we each had overlooked at one time or another, so it turned out we were a pretty good team. Aaron just humored me and let me do the power tool part and he did the engineering part, and Mitch-well he did all the scary parts like getting under the loft to screw in bolts to the wall when Aaron and I were too chicken too. Thanks Mitch, you’re our hero=). He also helped Aaron with all the heavy lifting a 7 month pregnant woman can’t do (though I tried hard because I really don’t like to ask for help), and helped us think though all our plans thoroughly. And really most importantly he and Aaron kept me company while I had a little building fun.

Materials for Step 2

4-4x8ft plywood 19/32inch thick cut down to size

2 1/2 inch wood screws (2 boxes)-to attach the plywood to the base

Playroom Building-13

Step 2-Attaching the plywood floor

We had big plans for going out early on Friday morning to try and hit some Black Friday deals and score ourselves a new drill, and Mitch wanted a sander to finish a project he was working on too (it’s by the bed that Aaron is sitting on in the picture above). We ended up staying up way too late talking though so when our alarms went off at 6am, we promptly both decided to snooze them indefinitely. I did want a little vacation too and sleeping in doesn’t happen too often around here. Mitch got up earlier than me on Friday and picked up a new drill for us along with his sander and some materials for his project.

I continued to finish attaching the 2x4’s and then we flipped over each box so we could attach the plywood to the top. We had assembled the boxes upside down so that we could lay the 2x4’s flush at the bottom (we laid it on a scrap piece of wood so we wouldn’t get carpet stuck in between the wood) rather than having to hold the 2x4’s up at the top of the box while screwing them in and hope that they would all be even. We don’t own a circular saw, so had Lowe’s cut down the plywood sheets to size for us. I waited to go buy the plywood until I was finished with Step 1 so that I could measure one more time and get the measured exact. I had figured out the measurements on paper, but after having the actual wood together I wanted to be sure that our dimensions were accurate with the slight differences that wood sometimes has in it. We attached the plywood with 2 1/2inch screws around the edge every foot or so and then a couple into each crossways 2x4. In the picture above you can see where we ended up having to add some 2x4 pieces cut shorter so that where the two pieces of plywood met they would have something to be screwed down into.

Materials for Step 3

2-4x4 8ft in length for corner support of loft

6-2x4 8ft in length to help support the loft as we lifted it up and screwed it into the wall. We ended up using these for later in the project so they were not a waste.

39-4inch lag bolts. We ended up having to go purchase a few more bolts than the initial 100 pack after seeing exactly how many we would need to attach the lofts into the wall.

Step 3-Attaching the loft to the wall

The next step was by far the hardest part of this whole thing and the one that I was super worried about. I think I had dreams of our whole house collapsing because we had attached these lofts into the studs and they broke them and the playroom started crumbling down. Crazy, I know. Almost every single loft I found online was solely supported by one pole on one side, with the rest of the loft securely attached to the wall. It was what set apart the lofts that looked built in and those that looked a little “homemade” for that lack of a better word. I wanted our loft to look like it was part of the house when we had it built. Our best option for the one leg wonder was a 4x4 pole. Our selection of this 4x4 is one thing I would do differently in the future. Those that had used a pressure treated 4x4 (which is all we could find) had mentioned that over time as it dried it could warp a bit and end up twisted a little. We didn’t really have a better option because we couldn’t find any regular 4x4’s at any place in town, but after we added the additional square column around it and it has had a few months to really dry out, I have noticed that one of the poles looks a little crooked and the other pole had a screw that seems to be popping out as the 4x4 is twisting. Live and learn I guess. I’m sure no one would notice but me, but it’s enough that next time I would do it different. When I think of how heavy that loft was to lift up, it’s amazing that just one pole can support it, but it does.

One thing that I am glad that I did when we built our house was to take pictures of almost all of the rooms before it was dry walled. Why I did that, at the time I wasn’t sure, but I was sure that it would come in handy later for something. This time it proved to be right. We were able to look at the pictures and figure out exactly where the studs were. With something as heavy as these, I wanted to make sure we weren’t just guessing where we thought the studs were, we needed them to be in the middle of the studs. We lucked out and above the toy closet was a header so along the whole length where we needed to bolt the loft into we knew was in a solid piece of wood. The other studs we were able to locate through the picture and from the attic above. We ended up putting in 19 bolts on this toy closet side loft. Overkill maybe, but secure for sure. We have had around 500lbs of teenagers up there before and not a budge. Now, I’m sure if they decided to jump up and down on it that may be another story, but for now after four months it’s not going anywhere.

Playroom framing-4

The other loft didn’t have a header, but we were able to find all of the studs and put 20 lag bolts into studs to secure it. I was just so grateful for those pictures-it saved us a ton of time locating studs and gave me a lot of piece of mind knowing that those things were attached absolutely secure.

Playroom framing-5

Here are a few pictures after they were attached to the walls. Hopefully I can explain how we got them there somewhat clearly. We laid the boxes on their side with the plywood side facing the wall. We attached the 4x4 permanent piece of wood with 5 lag bolts. Two from each side being careful to avoid the bolts that were already in there holding the box together, and one lag bolt down through the top. After that we attached two 2x4’s that were 8ft in length together temporarily with wood screws to make them be temporary poles for the three other corners. All of this was done while the box was on it’s side. The next part was a bit of trial and error. In hindsight we should have probably rallied some more help, but as three independent people we thought we could do it ourselves. The second loft was so much easier after a little practice on the first one. This is what ended up working-Aaron and Mitch each took a corner that was nearest to the wall and started to lift it up in the air. I was at the two corners that were closest to the French doors. I would run between the two corners and scoot in the 2x4’s and 4x4 as they would lift up. If the 2x4’s just drug along they would start to bend and break at where they were secured to the loft. Once we had the loft set in the corner the weight of it almost kept it tight against the wall-I think that is probably why from an engineering stand point this design of one major post and the rest of the loft secured to the wall works. We were then able to use the 4inch lag screws and attach each loft to the wall. The one on the left took 20 bolts and the one on the right took 19-overkill maybe, but we were glad we had studs available and could secure it so well.
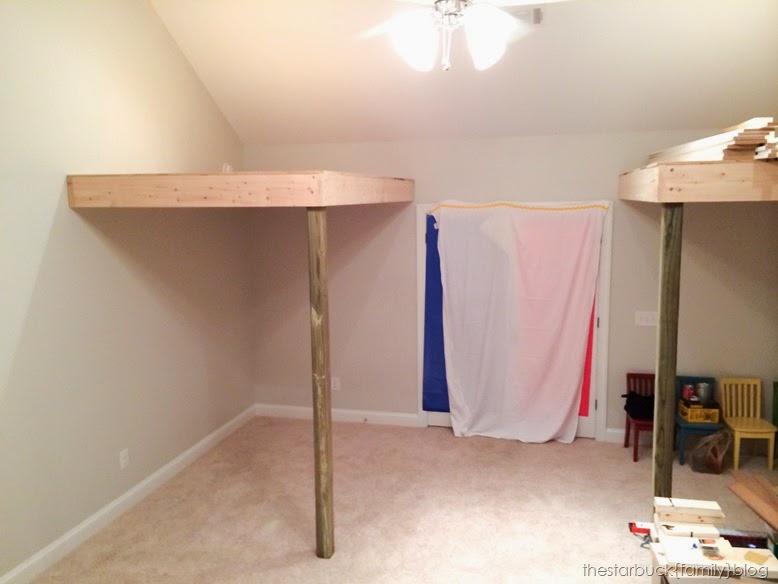
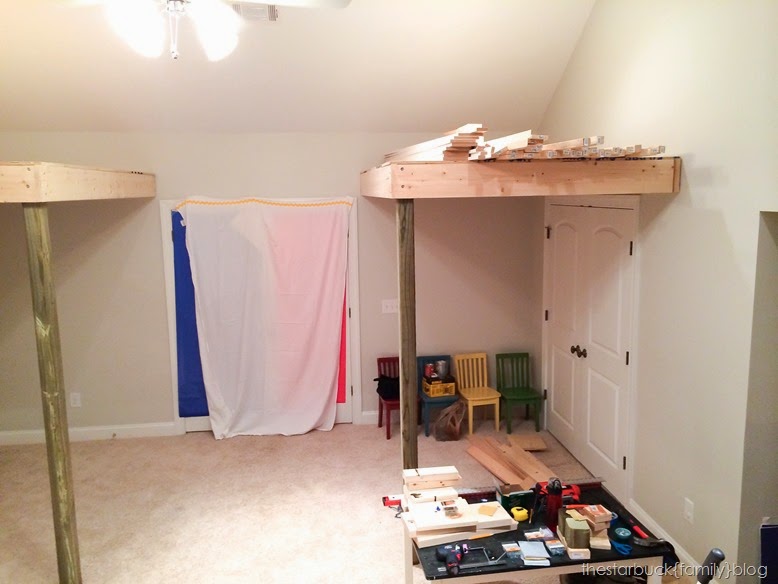
Playroom Building-3

Playroom Building-4

Aaron testing it out-once we were up there we realized how tall it really was-without the railing it was a little bit scary. I began to doubt if my kids would even want to go up there, but at this point it was a little too late to turn back. Luckily, once we got the railing built and attached it didn’t seem scary-still high enough up to seem pretty cool, but not as scary. You can get an idea of the head room available up there. It’s not a ton for an adult standing straight up, but for kids and teenagers it works great.
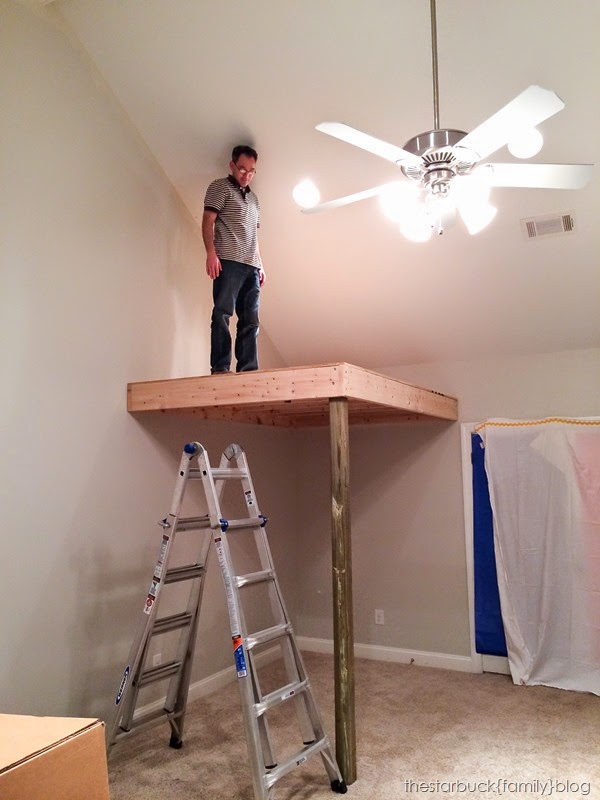
Playroom Building-6

Aaron working his mathematical magic while he explains something to us about the set up up there. I was happy to have both lofts officially attached to the walls by the end of the weekend. After that I knew that I would be able to finish the rest by myself with Aaron’s help for a few things. It felt so good to have what looked like two lofts in the works. I was pretty proud of us and what we had accomplished so far. At this point the kids obviously knew that we were building something for their surprise because we were just so loud with all of the tools. It still amazes me though that they didn’t try to come in and peak at what we were making-even the little boys. When the cousins arrived a few days before Christmas they even announced that they couldn’t come in because there were Christmas presents in there.
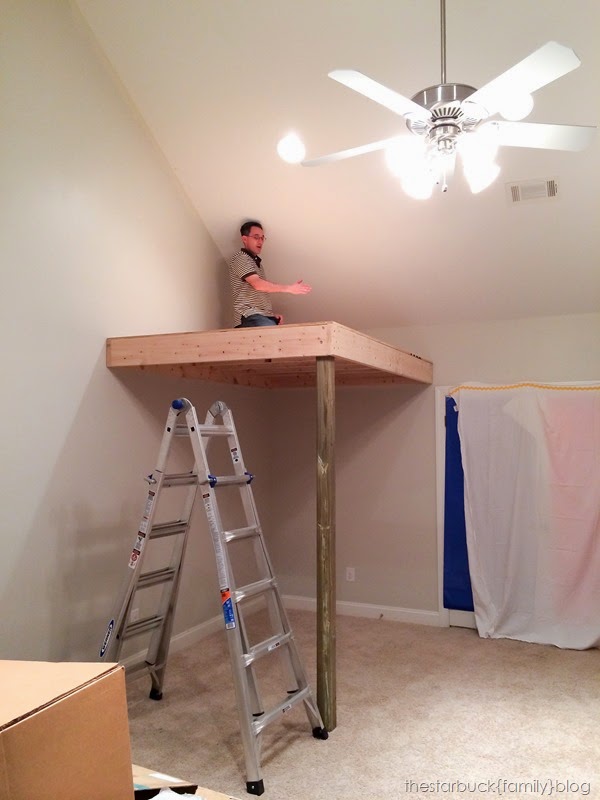
Playroom Building-9

Materials for Step 4

8-1x5 1/2inch primed white boards 8ft in length for columns

8-1x1 1/2inch primed white boards for trim around edges of loft

1-1x2 1/2inch primed white board for trim

1-1x4 board for trim around the top of columns

1-1x7inch primed white boards for trim along bottom of column

Other trim pieces for around column bottom and around edge of ceiling planking

2inch screws (50 count/1box)-used to screw the column together

Step 4-Building columns and attaching planking for ceiling underneath the loft

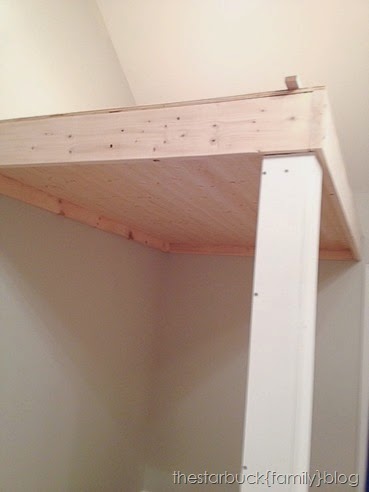
I knew that there were several things that we would need to rent a nail gun for. I tried to get things to a point where we would have to only rent it for one day. We needed it to attach the plank ceiling to the underside of the loft and to attach the trim around the poles and edges of the loft. I spent Monday building the two columns that would surround the 4x4’s of each loft. It would offer a bit more support and mimic in part all the molding that is in the rest of our house. I wanted these lofts to look as if there were part of the original house and I love how the columns turned out. I used the preprimed boards to create a box and then simply attached it to the 4x4 on two sides.

  Playroom Building-14Playroom Building-16 

For the trim I just attached various widths of primed 1x2’s and other trim molding. In the spots where I wasn’t able to countersink in the bolts when I attached the box frame together, I had to use a countersink bit and basically carve out the back of the piece of molding so it would lay flat. I wanted the underside of the loft to have a very finished look to it, so we found some tongue and grove planking at Lowes. They came 8? to a pack, and we ended up using exactly 3 packs per loft-six packs total. They were pretty easy to install, but it was definitely a two person job-so Aaron was happy when I actually let him help=). I would cut the boards to length and help hold while he would nail them in. I found a tutorial after the fact that shot the nail in at an angle right through the grove so that they wouldn’t have to fill so many nail holes. We had shot right through the top which turned out to be hundreds of nail holes to fill and sand. Great tip for next time though. One other thing that I would do different was that we had the 2x4’s to attach the boards to in the middle area, but on the edges there wasn’t. They fit pretty snug, but it would have been a good idea on the shorter 5ft length ends to have attached a 1x2 strip of wood so that we would have something at each end of the planks to secure it to-hopefully that makes sense. I loved how nice everything looked once the planks were up and the poles were finished out with molding. I put some molding around the edges of the planking so that it had a nice finished edge and covered up any gaps that were left.

Materials for Step 5

4-2x4 10ft in length for the sides of both ladders. I had originally thought I could use the 2x4’s we had purchased and used for extra support as we were attaching the loft to the wall, but hadn’t thought through that one good enough and realized with the angle that the ladder needed to be we would need ones that were slightly longer than 8ft

2-1x4 8ft in length for ladder rungs

2 1/2 inch screws (2 boxes)-to assembling ladder together and for the railings

Step 5-Building the loft ladders

Building the ladders was next. We used the 2x4’s at the 10ft length and cut them at angles on the top and bottom. We then used 1x4’s for the rungs of the ladders cut to 16inches wide. We bolted them to the loft from the back with the same 4inch lag bolts that we used for the rest of the loft. I ended up going back and covering up with wood filler all the other bolts, but I did leave the ladder ones exposed in case we needed to replace the ladders because of it braking. I attached the rungs with wood screws, but if I would do it again ( I may go back and redue this since I can unbolt the ladder) is to make a routered cut at each place that a rung is so the rung can slide into the 2x4 and then wood glue and screw it in. I think it will make for a much stronger ladder. We haven’t had too many problems, but we have had one rung break already that I need to replace. It had a little too much weight on it and I didn’t pre drill the holes so it created the wood to crack more easily.

Playroom Building-17

Materials for Step 6

8-1x4 8ft in length for railing top and bottom

20-2x2 8ft in length for railing spindles. Each pieces was cut down into 3 pieces for a total of about 60 pieces that were each 31inch in length. I cut them as I went along and ended up being able to return a few that we didn’t use.

Left over 2x4’s for newel posts

2 1/2 inch screws for attaching the posts to railing and railing to the plywood loft floor

Step 6-Building the railing

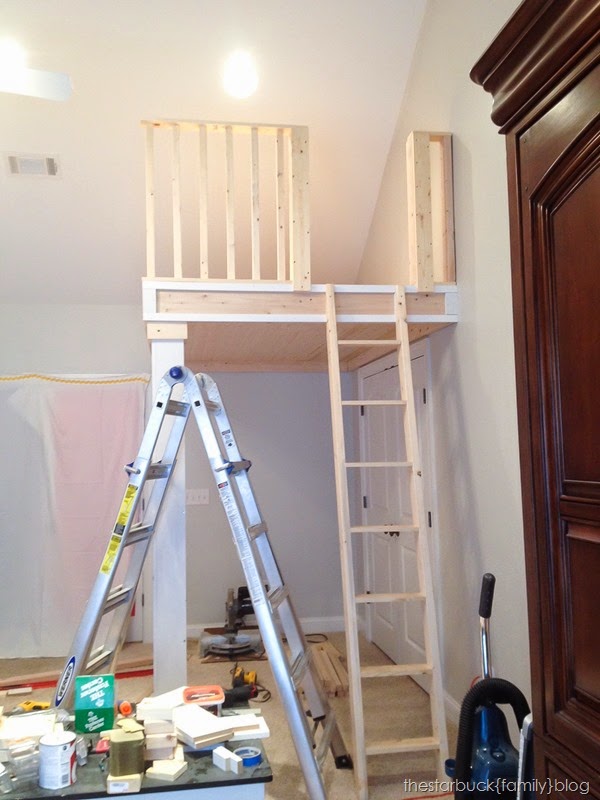
The railing was the last part of the building that needed to be done, and it took probably the longest because of all the angles. I don’t have a lot of pictures but when you see the final pictures you can see how the side railings all came together. I built two boxes that became the larger newel posts at the top of the ladder. We set them farther apart than the 16inch rung width just to give a little extra room when climbing up-a suggestion from Aaron that was much needed. It made a big difference in climbing in and out comfortably. The 1x4 on the front of the post was cut a little longer so that it overlapped the loft floor and we would be able to screw it into the front of the loft. I cut the remaining spindles to 31 inches and then sanded each one down individually to make them extra smooth. We basically used our staircase in our home as a model for how tall to make the railing and how far apart to place the spindles. I am not sure how lofts are treated during a home inspection, but we wanted to make sure that they were at least equal to our staircase should we ever move and they needed to be a specific height. That of course was second to just having it really high so that my little kids wouldn’t fall-something I worried about, but they really play so carefully up there and we are up in the playroom when the little boys play up there just to be extra careful. Getting the railing fitted against the ceiling on the side railings was the trickiest part. I basically had to make the entire railing and then slide it into place. It was super tricky and a tight fit. The top and bottom of the railing is made from 1x4’s and the spindles are 2x2’s that are predrilled and then screwed in from the bottom 1x4. That 1x4 was then screwed into the plywood loft base. We connected the top and bottom railing parts at the corners with flat metal plates on the underside and top of the railings. The railing is also screwed into studs at both sides. The picture below is when just the front railing was installed, I don’t have a before picture of the side railing before it was painted.
Playroom Building-18

Step 7-1000-Sanding and Painting

Okay so there wasn't that many more steps, but what was left was a lot of filling holes, sanding, caulking, painting with a primer, sanding again, wiping down and vacuuming everything really good, and then painting it a glossy white paint. It felt like about a thousand steps because it took so long. I was still painting up until the few hours before Christmas. I actually still need to go back and do another coat in some spots. Those railing spindles and ladder rungs took forever to paint, but in the end I was super happy with how it turned out. I still can’t quite believe that we built this. Aaron and I would just stand up there looking at it saying, “This is SO cool!” I am pretty sure that we were building this in part for ourselves as well to satisfy some childhood dream. Either way, it turned out pretty great, and come Christmas morning the kids were beside themselves with excitement.

4.24.2014

{ Our Playroom Makeover-Part 1 The Planning }

I am realizing why I have put off writing this post for the last four months-it is LONG! I decided that it would be better to divide it up into four different posts to help a little –The Planning, The Building, The Decorating, and The Finished Room. I just have too much to record for each part, and I don’t want to skimp on remembering all that went into this-for my own sake and for my kids who didn’t get to see all the before stuff that happened. I really want to remember this whole process, not just the great after-though I really love that too! I think it was just the first time that I felt like I decorated a room the “right way” (more on that later) so I need to remember this as I slowly work on each room in our house. I really did learn so much through all of this.

For Christmas this last year, we decided to do something a little different than we have ever done before for our gift giving. As Christmas neared I was so excited and was looking forward to it especially since we would be having family come, and I was determined to have all my shopping done early even though I still wasn’t due with Ethan until February. At Christmas our kids each only receive three gifts-one from Santa, one from each other that they have made in part (they draw names so each person secretly only makes/buys a gift for one other person), and a gift from us. As I started brainstorming all of my gift giving purchases I was super frustrated by a couple of things.

First, I felt like my kids already have too many toys, gadgets, clothes, etc., and many that they don’t even play with or use anymore-they just end up scattered on the floor instead of actually being used.

Second, I felt like I was having a hard time finding presents that really stood out to me-I was not impressed with the selection of toys in the stores/online. We have really tried to keep fewer toys while staying in a theme-Little People, Legos, toy kitchen, dolls, cars and trucks, wood blocks,Geotracks, and avoid just buying one of this little thing and one of that thing that in the end just end up getting lost in the mix. I am definitely one to pitch McDonalds' kid’s meals toys when my kids aren’t looking. It’s not the answer for everyone, but for us it just works better to keep a bigger collection of things that they actually play with and love,and they seem to have more fun with more pieces to a few things, than fewer pieces to many things. With the poor selection of toys I was beginning to feel like I was doomed to just buy something to buy something even if it wasn’t something I loved, they loved, or we needed. Not a good use of resources in my opinion, and the exact opposite of what we have been trying to teach our kids. We really want them to think through their purchases, save their money for it, and only buy what they need, or really love, not just “things” for the sake of having more things.

Third, I am a big believer in the fact that kids create memories from doing things and sometimes just getting a physical gift doesn’t always create those lasting memories for many years to come. I really can’t remember but a handful of presents I ever received as a kid, and when I asked my kids they couldn’t remember many they had received either. So the option of going on a trip for Christmas was tossed in the mix. After careful consideration though, traveling anywhere at 32 weeks pregnant didn’t appeal to me as much as I thought it would, so that idea kind of got put on the back burner for another year.

And last, I felt like a bit of a hypocrite for asking my kids to hand make part of their gifts for each other so they would be more meaningful when I myself wasn’t willing to do the same.

One day I was up in our playroom with Scott and Ryan while they were watching TV, and as I was sitting on one of our only pieces of furniture up there-a broken Lazy-boy recliner, I was thinking about how much I loved this room as we were building the house, and how unused it was now. I hated the thought that we had put so much money and effort into building this room and now it felt like wasted space.

Playroom Makeover Before blog-1

We had all the kids toys up here, our big wood TV cabinet with our only TV in the house, and a Lazy-boy recliner. The kids would come up here to watch TV, but since there wasn’t anything but floor space to sit on, they rarely invited their friends up there, and movie night became a battle for who would actually get to sit in the chair. The rest of the time the little boys would get all of their toys from the toy closet and spread them out over the whole room, pretty much taking over the entire space. When the girls would complain about doing something downstairs and I would say, “Go upstairs we have a whole playroom for that”, I would get moans and groans about how the boys messed it up and there was no where to play.

After coming from our other house which had no real dedicated play place, I was so excited to having a place where all the toys could be that was away from the main living area (though the little boys still have a cupboard of some toys down in the family room), where the kids could be loud when we needed some quiet time downstairs, and where I could shut the door and not have to clean up everyday. It made me sad that we had somehow missed the mark a little bit. Enter.. an “Idea for a Christmas present”. I decided that a present didn’t have to be something that they opened up, but could still be almost as memorable as a trip for them. I was determined to “makeover” the playroom for our one present to them, as kind of one big combined present. I hadn’t thought through all of the details, but at that moment I was so much more  excited for Christmas. The real spirit of giving came back, and I was so excited to make a place that we could truly enjoy as a family.

Here are some more of the before pictures. It was a great room and had great light from the three windows, it just needed some careful planning of the space, some furniture, and a little bit of love to make the space work for us.

BEFORE

Playroom Makeover Before blog-2

One of the first things that we needed to do was repaint, thus all of the stuff in the room being in the middle. This part was not a surprise for the kids-we just played it off like we needed to repaint in there. Scott or Ryan had drawn with permanent marker all over the wall (you can see a bit of it to the right), and we had a ton of nail pops on that wall and huge gash marks from where the kids would hit the Lazy Boy back into the wall. It was not pretty. I was really wanting a light gray in there instead of the same neutral color that was downstairs that I had painted over in the family room. Again, a great color, just not what I had in mind for this area.

A built in desk area that the kids never used. It was mostly a spot for them to drop junk on.

Playroom Makeover Before blog-4

The toy closet that I had partially started to organize with bins. I had a ton more that I had gotten at the dollar store. I really did love the colors of the blue, green, and turquoise, but many ended up getting stood on and broken. I had made some chalkboard labels that didn’t hold up very well either. The toy closet needed to be overhauled along with the rest of the room. I started by donating any toys that they no longer played with, and only kept the ones that they really loved. I am a big fan of imaginary play so I like the old standbys like Legos (big and small), things that they can play house with-(dolls,play kitchen,dress up), our wooden doll house set that I still had all the pieces to, but the actually doll house itself broke from the kids stepping on it to climb up and reach other things, and the Little People. I decided to keep a few Barbie's too, though they don’t play with those as much as the American Girl Dolls.

Playroom Makeover Before blog-5

Playroom Makeover Before blog-7

Our ceilings up on the second floor are nine feet tall, but when we were building our house we were able to change out the plans while they were framing and made this ceiling the full height of the roof. It is about 20ft tall in the center and then tapers down to nine foot where the ceiling meets the wall. The dimensions of the room are twenty-one feet long (from window to French doors) by 17 feet wide. Just for reference, the TV cabinet is exactly eight feet tall-that thing is a beast!-it is super heavy and was one piece that was staying in the room, so you can see in comparison how tall the ceilings are. I love the tall ceilings, and how they make the room seem even bigger than it is, but part of me kept thinking that there was a whole lot of useful space up there past the eight foot mark.

Playroom Makeover Before blog-3

I started toying with the idea of not just making over the room in terms of furnishing and decorating it, but building a loft (or two) in there. Even though I loved the decorating/furnishing plan I had come up with (see below), I felt like I still needed that WOW factor that it lacked so that even my big kids would feel the whole magical feelings of Christmas when they saw it. I had thought of having a loft built in there before, but it would have been more money than we had budgeted for the whole room. I really wanted one that ran the whole length of the long wall opposite the TV, so the kids could sit up there and see the TV, but the window placement was causing a problem for that plan to work. I started pinning pictures of lofts on Pinterest while I just mulled over the idea. I finally couldn’t get it out of my head and just kept thinking of all of the options of how we could build one ourselves. I dropped hints to Aaron about how cool that would be to have a loft in there. His answer was, “You are already planning on building one aren’t you?” He knows me well! He is such a good sport when I get these crazy big ideas. Like redoing the backyard at our other house, or building the pantry there, building the fire pit here at this house, and now this. I think he just wishes I would stop coming up with them when I am pregnant, or just stick to the little ones that are more feasible. He knows that they always seem to take longer than expected and with a Christmas deadline he knew we would have to work very diligently to finish in time.

My brother was coming for Thanksgiving so I knew that I needed to have everything planned out by then so he could help us start building them that weekend-we would be on our own after that. I scoured the internet for all kinds of plans and ended up kind of making up our own by combining several different ideas. My idea was to make a loft to the left of the French doors (while facing them from inside the room) that was 5ft wide by 8 ft. long. and it would be about six feet tall with a railing that would be taller than that. I wanted us to be able to walk under them even as adults and fully use that space underneath so nothing was wasted. As I started sketching out ideas for the layout of the room, the size of the loft just didn’t seem that big. It was a okay size, but with seven kids I knew that we needed a bit more space, and there was still so much room up top. My concern was getting one too big that from an engineering stand point would have been too much for us to handle-one of the other reasons that we didn’t want to DIY a longer one across the whole length of the room.The 5x8 size was perfect.

Playroom Makeover Before blog-6

One night as I was up there watching TV and just playing around with ideas, I got the idea to build not just one but TWO lofts up there-one on either side of the French doors. I wondered why I hadn’t thought of this before-it would give us double the space-about 80sq feet more to the room, but still keep each one within the building size we wanted. By not running the entire length of the short wall too, we would avoid having to wire in lights under the loft. This way the lights from above could still shine through the middle section. The lofts would frame the door nicely and I loved the idea of the symmetry it would give to the room. One of the big issues was that we would have to make them taller so that the one on the right would be able to have the toy closet doors clear it. At eight feet tall instead of six it was becoming more of a tree house size than just a simple loft, but I was in love with the idea. I was beginning to feel the joy that comes from being able to give them something that was hand made too.

For the decorating part of the room, I came up with an initial plan that looked something like this: I put in all of the options for different tables that I was looking at, and several more things that I hadn’t fully decided on yet. I will write down in detail all of the ideas I had and my thoughts for each item, as well as what I thought about for the furniture placement in the decorating post.

image

4.01.2014

{ Spring Has Arrived at Our House…Or at Least the Front Room }

We have been teased for the last few weeks with warmer temperatures, but I think that they are finally going to stick and usher in spring down here in the south. The kids have enjoyed being barefoot and running around outside like it’s the middle of summer. The other day they even whipped out their swimming suits and wanted to run through the sprinklers. My advice that it wasn’t quite that warm fell on empty ears, so we just let the natural consequences follow. A few minutes later I had shivering little people running inside looking for their beach towels to warm them up.

Front Room Spring Yellow blog-1Front Room Spring Yellow blog-16

Though it isn’t quite time to be enjoying the weather from the view at the side of a pool, I am enjoying the view of all the beautiful things that spring has to offer. Bright yellow flowers, bees buzzing around once again, and the nice cool fresh breeze when I open up all our windows in our house. I just love it! I decided I better capture those feelings of spring in our house before the cooler temperatures try to sneak their way back into our life. Our family room has been craving some nice cheery springtime colors since it lost all of it’s Christmas decorations months ago.

   Front Room Spring Yellow blog-29 Front Room Spring Yellow blog-28

Our front room is one of my favorite spots in the house, but unfortunately it has sat mostly undecorated for the last two years since moving in. My grand idea to have these fabulous built ins around the fireplace became a huge challenge when it came to actually putting something on them. I had tried so many different items, and then would just end up returning them to the store because they didn’t look just right. I only wanted to put stuff on display that were things I truly loved. I go by this room a couple dozen times a day, and I wanted to see things that had sentimental meaning to me or just made me happy when I looked at them. I wasn’t interested in a bunch of little items I would end up dusting all the time-just deliberately placed things to brighten up the space. For a while the paint in that room had bothered me, but after I painted it this last summer it was much better. I thought that I would be able to just decorate to my little hearts content after that, but then I was still stuck. I began to actually wonder if I had made a mistake in painting it, and my wacky pregnant mind almost started hating the blue in there.

   Front Room Spring Yellow blog-3Front Room Spring Yellow blog-11

Last fall before Thanksgiving I finally figured out what part of my hang up was-there was just too much white. I LOVE white in my house and thought when we built them that the clean palette would be great. What ended up happening was that things were just getting lost in a big sea of white. I looked at a lot of different options-painting the back of the shelves (I didn’t want to ruin the nice smooth finish that was sprayed on when they built them though), wallpaper (too hard to remove if I change my mind), vinyl designs I could apply (too expensive), stencils designs I could paint on (too time consuming to apply).

    Front Room Spring Yellow blog-4Front Room Spring Yellow blog-5

I finally decided on fabric. I was on the hunt for a great neutral fabric with just a bit of kick that I could add a pop of color to throughout the different seasons. I scored some at Joann's that was on sale, and I applied it with liquid starch. Once it dried, it looked as good as wallpaper, but I can remove it if I don’t like it down the line and it will have no damage to the painted built ins.I loved the pattern and punch it gave to the room, without a lot of commitment on my part-I think paint and wallpaper would have been too much work to reverse. Now with the fabric there I love the contrast with the light blue walls-I am so glad I didn’t paint them again.

Front Room Spring Yellow blog-17

Front Room Spring Yellow blog-8Front Room Spring Yellow blog-2Front Room Spring Yellow blog-12   Front Room Spring Yellow blog-10 Front Room Spring Yellow blog-9  Front Room Spring Yellow blog-7   Front Room Spring Yellow blog-15 Front Room Spring Yellow blog-14

One issue I had with this room is our big leather sectional. It is a great sectional, but man is it BIG. With a family of 10, we need a lot of seating, but it just felt like it was always taking over the room, and I think with the dark color it just stood out too much. I had dreams of getting two lighter colored sofas and having them face each other and be perpendicular to the fireplace with a couple chairs where the back of the couch is. I couldn’t find any couches I loved or could afford right now, and I think reality hit that leather is really the best option for here where we have lots of little messy fingers close by. I was trying to figure out a way to disguise the couch more without having to actually get rid of it. Once I knew that this couch was going to have to stick around for awhile, I decided that I wanted a long console table behind it with two large baskets. I found a few console tables I liked on Pinterest, but when it came time to look for them to buy, they were no longer sold or I couldn’t locate them in my area. Boo! One thing I don’t love about Pinterest. I finally found this table and fell in love with it! It was on sale at World Market and they had the exact baskets on sale I had been looking for too at Pottery Barn, but with a much nicer price tag-love that! We keep all of our scriptures in one basket and the kids soft blankets in the other.

Front Room Spring Yellow blog-26   Front Room Spring Yellow blog-19 Front Room Spring Yellow blog-18

I am finding out that I didn’t pay nearly enough attention to lighting when we built our house. We get really great natural light in this part of the house during the day, but at night it never seems bright enough to me. I was on the search for some lamps to put on the console table. I had three different pairs at one time just trying to find the right match. I love the simplicity of these glass ones. They can actually be opened up and filled with things, which we tried out at Christmas time, or just left clear for a nice clean look. I am so happy with them! I love that because they are clear they seem to not obstruct the view from the kitchen into the family room, but still serve to divide the space up a little.

Front Room Spring Yellow blog-32Front Room Spring Yellow blog-20 Front Room Spring Yellow blog-25Front Room Spring Yellow blog-24  

I love our set of little chairs. Our family mission statement is “No empty chairs”, and these make me think of that goal every time I see them sitting up on the shelves. They originally sold at Pottery Barn for $100?, but I scored them on ebay for $25 plus free shipping! Brianna noticed that there are only 6 chairs and we have 10 people…so we need another set. I am on the lookout for some more to make our family set complete.

The disco ball. Oh, how I LOVE that disco ball. After buying one for the playroom we made over at Christmas (still need to blog about that) I decided that I think every room needs a disco ball. It adds just the right amount of whimsy so the room doesn’t seem too serious (we are far from serious at this place) and when the light hits it, it bounces around all these fun little lights that seem to dance around on the ceiling and walls. It it just fun and makes me smile-I love a house that makes me smile.

   Front Room Spring Yellow blog-22 Front Room Spring Yellow blog-30Front Room Spring Yellow blog-6

The mirror above the fireplace was a birthday present from Aaron this year. I had admired one on a decorating blog I read for quite sometime-though hers was black and she painted it white. I was searching online and came upon this one, and happily notified Aaron that I found my birthday present-he likes my help like that =) I struggled to take down the picture of the Savior I had hanging there, but decided that I was going to make a fun gallery wall including a new picture of the Savior I found on the wall to the left behind the sofa. This is the new picture. I am excited to get that done-I love the new picture! I have the old one sitting in the piano room right now waiting to be rehung somewhere in the house.

Front Room Spring Yellow blog-21

    Front Room Spring Yellow blog-33Front Room Spring Yellow blog-31Front Room Spring Yellow blog-27

I love my new spring house. After I had put up the fabric and we had gotten the console table and lamps, Brianna came home from school and was so excited that our house looked so…decorated. It made me smile, and happy that looking at it made her feel the happiness that a little decorating brought to the home.

Source List (mostly for myself because I have a crazy bad memory and I want to remember where I finally found some of this stuff that I looked forever for, for when I actually get around to decorating the rest of my house.)

Paint color-Sherwin Williams Quicksilver

Brown Leather Sofa-Furnitureland South in North Carolina about 8 years ago

White Casbah Mirror above fireplace -Lamps Plus

Everett Foyer Table-Cost Plus World Market (on sale and an additional sale I could combine+free shipping)

Large Baskets-Cost Plus World Market (sale)

Lamps and Lamp shades-Better Home and Garden Collection-Wal-mart

White wood box on console table-Hobby Lobby (40% coupon)

Yellow flowers and green moss balls in white box-Hobby Lobby (sale)

Metal spheres, gray picture frames-Target

White candle stick, white Moroccan vase, small yellow vase, green glass vase, yellow picture frame, large wood lantern, white square tray on mantel, light blue and yellow pillows on couch, white silver dollar shells, canvas quote, white pitcher for lemons-TJ Maxx

Yellow and white flower bowls and plate-Pier 1 Imports (Clearance)

Numbered glass jars, watercolor painting on bookshelf, wood tray on bookshelf by yellow/white bowls-France during trip last spring break

Baskets on bookshelf-Michaels (50% off)

Disco Ball-Wal-mart in party section

Six Pottery Barn wooden miniature chairs-ebay

Big wooden trough on bookshelf-ebay

White pillow on couch-Pottery Barn

White and green chevron blanket-Homegoods

Gray and white fabric on bookshelves-Joann Fabrics

Temple Picture-Cari Osborne Photography