5.12.2014

{ Austin Turns 14 }

14 years ago I spent a special Mother’s Day at home by myself. Well, myself and this little-at-the-time guy. We had been home from the hospital just a couple of days and already he had us hooked. That cute smile and that dimple that hadn’t yet made it’s way onto his cheek yet. Yep, we were pretty much smitten. With his second little mommy always close by, we felt pretty blessed with our two little ones.

There are times that that day seems like it was just yesterday-now I look and my two oldest are in their full fledged teenage years-and like Aaron and I always say about every stage in our kids life-THIS is our favorite. It has been so much fun to see our teenagers-now one boy and one girl share their different perspectives on being a teenager. They are just so much FUN! We really couldn’t ask for more. Getting to celebrate Austin’s 14th birthday just seems like icing on the cake (no pun intended). That face we oohed and ahhed over 14 years ago just keeps getting cuter and cuter, and sure makes me proud to me his mom.

Austin 14th Birthday blog-19

Austin’s birthday fell on Friday, but after having a crazy week-the festivities were a little lacking. Aaron and I were able to still take Austin out to dinner-just the three of us, and then Aaron took him and Brianna to see a movie, but by the time they got home it was late that night, and even most of the cupcakes had been consumed. It was a bit of a birthday fail. He assured me that opening presents was a bit overrated anyways. Is that a good kid or what to make his unorganized mom feel better=) We  I decided after we I had recovered from the previous week, that a good old fashioned party surprise was due for this kid.

Austin 14th Birthday blog-1

Austin 14th Birthday blog-5

   Austin 14th Birthday blog-3 Austin 14th Birthday blog-8Austin 14th Birthday blog-7

The little boys helped me get all the special party things in order, and even helped wrap the presents. They love getting set up for parties-their excitement just seems to leak out onto the rest of us. We had everything all ready…and then we just waited for him to come home off of the bus. We hid behind the island and then all jumped out to yell SURPRISE! I think his initial terror turned to happiness when he realized it was all for him.

   Austin 14th Birthday blog-6 Austin 14th Birthday blog-10Austin 14th Birthday blog-11Austin 14th Birthday blog-12Austin 14th Birthday blog-9

Austin has been super patient for that big growth spurt to hit..and hit it has. He has grown 8 inches in the last two years and like Brianna has passed me up in height. It’s a bit humbling to have to look up to my little boy now.

Austin 14th Birthday blog-13

Austin 14th Birthday blog-15

Austin 14th Birthday blog-16

Austin 14th Birthday blog-17

Austin 14th Birthday blog-18

  Austin 14th Birthday blog-20 Austin 14th Birthday blog-21

Austin 14th Birthday blog-22

Austin 14th Birthday blog-23

Austin 14th Birthday blog-24

Austin 14th Birthday blog-25

Austin 14th Birthday blog-27   Austin 14th Birthday blog-26  Austin 14th Birthday blog-28

14 Things We Love About Austin at 14

  • That cute smile and dimple still win us over.
  • The way he honors the Priesthood. About a month ago Aaron and I were talking about morning scripture time. Unfortunately, I am still pretty exhausted at 6am-so I have been sleeping through family scripture time. I was feeling bad about that when Aaron has to go in early to work. He suggested that Austin just lead scripture time. I felt bad that he would have to do that. Austin turned to me and says, “Don’t worry mom, I have the Priesthood, I can do it.” I think my heart grew three sizes that day, and I was very humbled by this kid.
  • His sense of style. He likes wearing button up shirts with the sleeves rolled up and his new shoes. His new thing is wearing bow ties to church with his new church pants. I couldn’t believe he had gone up so many sizes in pants when we went shopping a few weeks ago-that kid is getting tall! At the end of the day he still loves to wear  his old stand by-a white t-shirt (which he seems to outgrow super fast) and a pair of soccer shorts.
  • His sense of humor. He still keeps up laughing with his funny Mr. Bean smile and funny jokes.
  • His testimony. Every fast Sunday we do a special testimony meetings in the front room right after church. I love to hear his testimony about what they discussed in class-I can tell he really listens and how much he loves and looks up to his leaders. I am so grateful for their example to him. It had helped to foster a love for the Priesthood, missions, and respecting others.
  • He looks for ways to help out. He has a special way of telling when I am at the end of my rope, and steps in to help when Aaron is gone. He will grab Ryan for me and help keep him occupied with something while I am busy with Ethan or making dinner.
  • The way he cuddles with Ethan. Priceless.
  • How he gets a little restless and we know that he needs to wrestle with dad. He likes to play around like he can take Aaron down, I think knowing that Aaron can still beat him-but loves the challenge anyways. When your dad’s a wrestling State Champ it’s just something you need to challenge.=) One of these days he may get bigger than Aaron and can take him down, but for now Aaron’s pretty happy he can still one up him.
  • Talking with him. I love talking with my teenagers. Sometimes they don’t talk when you wish they would-so I love to take anything I can get in this category. I love to hear even the little things from school or church that he likes to tell us about.
  • His easy going nature. I mean really-who would let their birthday pass with no presents to open. This kid is a gem.
  • The sincerity of his feelings. When he lets those feelings show, there is no doubt they are pure and real.
  • His thoughtfulness for others.
  • The sense of balance he brings to our family. It’s hard to see until someone is gone on a trip or at a camp how much they add to the family.
  • The way he just asks for something, but doesn’t beg or nag about it. The poor kid had church pants that were too tight in the waist forever, and he would just kindly remind me, and not hassle me about it because he knew how busy I was. A gem I tell you.

WE Love you Austin!!!!Happy Birthday!

5.11.2014

{ Seven For Sunday-Mother’s Day Thoughts }

I need to do a whole separate post for Mother’s Day, but thought I would jot down a few thoughts lately about my great kids since they were the ones that made me a mother in the first place. These “Seven for Sundays are suppose to be brief snippets, but I am realizing that these are pretty lengthy today-I guess I had a lot of great thoughts about these kids of mine, and the little things they have done lately.

1. Brianna has been really studying hard for her two AP exams at school, and has been pretty stressed about them. On Friday she had her first one and needed to be at school extra early. Aaron was working on inpatient the whole week so I had been taking Brianna to seminary. That morning our schedule was a little crazier than usual. The rest of the week I had been leaving at 6:40am, taking her to the church for seminary, going back and picking up the girls to take them to school and then getting back before 8 so Austin could catch the bus. This morning I needed to leave with Brianna and all of the girls to get her to school by 7:30am, then the girls to school before 8am. We then drove back home to get Austin and take him to breakfast at Chic-filet for his birthday breakfast. The kids had done scripture time on their own because Aaron had left early and I had slept in because I was up during the night with Ethan. When I came out the kids were all ready, lunches made, Brianna had done the girls hair, and they were all ready to go. The whole drive down to the school Brianna was reminding herself of “one last thing” she would need to know for her test and looking over her flashcards one last time. She was really nervous-I asked if she had a pencil “Yes, I had seventeen of them.”-SO nervous!. As she got out of the car the girls all shouted out last minute encouragements to her. It made my heart swell with love for these kids-I love families, and there in front of her high school I was reminded of what a special thing that is.

2. We talk A LOT at our house. We just do. All of my kids have gotten remarks on their report cards that they talk too much. Every. Single. One. Of. Them. We are just big talkers-as you can tell from some of my very lengthy posts. I have inherited the “talking gene” from my dad, and all of my kids have inherited it from me. A few weeks ago Brianna was telling us at dinner about how so many of her friends and kids at school don’t eat dinner together-they either eat alone in their bedroom (what?) or in front of the TV, but not together as a family. One friend mentioned that she only eats with her parents at Christmas and Easter, and it’s really awkward and hard to even talk with them. It made me so sad for her, and then Brianna says, “That is really sad. I just like our family so much.” (Like= more than a “I liked your Instagram picture, but in a higher plane than even love-it’s a crazy teenager thing) I “like” our family too and so glad that we talk so much and enjoy each other’s company.

3. Last night Brooke and Erika thought it would be a great idea to draw mustaches, goatees, and really bushy unibrows on themselves with permanent marker. Yes, permanent marker. It was kind of like an early mother’s day present to me-you know getting to walk into church with all my lovely kids perfectly dressed trailing behind me-WITH MARKER MUSTACHES on. Yea for me. Luckily, that permanent part only seems to work on paper and walls, not on faces. I was in between trying to look all mad and serious like and wanting to burst out laughing. I held my laughter in enough so the little boys wouldn’t see me-we are having major issues with them drawing on stuff. Like pen on the cloth dining room chairs and other furniture and walls. It makes my head spin sometimes. Hence-no pictures of this little mustache incident-we couldn’t applaud such “naughty” behavior. (though I am pretty sure that if that permanent marker had really carried through on it’s promise the embarrassment for them would have been punishment enough)

4.Ethan is really a good baby. He is starting to sleep good at night. He will go to sleep around 9:30-10:00pm and sleep most nights until 3am. Unfortunately, I can’t seem to get myself to bed that early to actually take advantage of those sleeping hours.

5. Abby got her own set of scriptures for her birthday. She loves those things. She carries them around just waiting for a chance to read them and then makes little lists of the things that she has read and what she wants to read the next day. It’s definitely one of those proud mama moments I dream of.

6. Aaron and I took Austin out to eat at Red Lobster for his birthday on Friday. It was fun hanging out-just the three of us. We laughed at the Scott-look-alike waiter, ate until we were stuffed, and then Aaron took him and Brianna and her friend Ashleigh to a late movie. I went home and let the other kids watch a movie for movie night and then got them to bed. Before we had movie night I reminded the girls to read their scriptures for the day, and since I had already read mine, I took the boys up to the playroom to watch PBSkids for their “movie night”. I basically fell asleep on the couch with Ethan. At almost midnight we went downstairs to bed (the boys wanted to sleep on our floor and at midnight I wasn’t in the mood for a fight) I was getting their blankets ready and Scott is looking around for their kids scripture picture book. I was SO tired and really just wanted to go to bed. Scott continues to look, and I continue to just be tired. He finally says, “Where is our scripture book? Dad says we have to read everyday.” It’s crazy how fast a five year old can humble you. We find it and both boys climb up on my bed for a late night read. The next day when Aaron asked Scott to go get the book and what story we were on, Scott turned to it and told him back the whole story. I wanted to tear up right there-what an example this kid is to me on being diligent.

7. Every day for school Erika has to have a paper initialed for her behavior the day before. If the behavior was good then you get a little sticker. We are usually not on top of it to sign it the night before, so it’s a sign-in-the-car-on-the-way-to-school-at-the-stoplight kind of thing. She had it out and was talking about it to Brooke. Erika was mentioning how she had gotten all stickers this nine weeks and how a girl in her class had gotten stickers all year long. Brooke asked, “So what do you get for it?” Erika responded,”You get a happy mom, and a happy life!” Yes, happy moms make for a happy life.

8. A while ago I was talking to Scott at lunch and he was completely ignoring what I was saying to him. I was getting a little huffy at his complete defiance for what I was trying to tell him. He finally turns to me and in his sassy little voice says, “I was imaging that your voice was invisible.” Nice.

5.07.2014

{ Life Lessons–To Live The Life of A Tulip }

Tulips are funny things some times.

They start out standing tall and look so dignified with their petals all closed up tight.

You bring them home, wash them up all pretty, trim some dead weight off the bottom and give them a happy new home in a fancy vase and there they stand ready to show off all they’ve got for all to see.

Over the next few days I notice that their tall and straight demeanor seems to fall a little-sometimes I think they just need a new view of the window from where they are sitting. Other times they just seem to follow the light. But by day eight they seem to be just downright tired, barely able to keep there once colorful blooms lifted up for anyone to see, sometimes amidst a sea of other tulips who still seem to be standing tall and proud.

flowers blog

There are days I feel like those eight day old tulips.

I feel like my once dignified and straight and tall demeanor fades and I often feel like just holding up my petals seems like such an impossible effort. I’m sure that all that weariness has a lot to do with those late night feedings that I am currently being exposed to. I’ve been known to say that I would rather get up every two hours feeding a newborn than having to potty train a kid. Now, I’m getting to do both. There are days when I wonder if life will ever by the same again.

Will there ever be a time when my house will ever be picked up again? Clean? I think I gave up that dream a while ago, but just picked up, is that too much to ask? And some days I really wish dinner would just cook itself. I’m actually considering changing my 2 meal a day cereal limit. Cereal can’t be all that bad if consumed for a full 24hours, can it? Will life be normal again? Will we get back to a normal schedule and normal bedtimes and normal activities that don’t involve running around like crazy people from one activity to the next.

Truth be told, there are days when this mothering thing is just SO hard. There are days that all those tidying up things get combined with all the really important things like all the worries and dreams I have for and about my kids, and all the things I need to teach them, and all those overwhelming feeling of love I have for them that just can’t seem to be put into words-they just sit in my heart and grow and grow with every look at each one of my precious kids. My mind swirls with how amazing they are and if I am helping them become all they can be. Are they learning to be kind and charitable? Am I teaching them to be compassionate and loving? Are they responsible and know how to work? I look and suddenly there I was, a tired little tulip who feels like holding up those petals is a little too hard for a while.

I had one of those days. And Aaron came home to my rescue without even knowing the super hero he was being. I got to go and actually take a nap with Ethan sleeping soundly next to me on my bed. When I woke up there was a sweet little note laying on my nightstand next to my bed.

“I love you mom. Love, Erika”. It had a pretty white flower taped to the edge of it.

Will my life ever by the same?

No, I’m confident it won’t. Because I am a mom, my life has been forever changed. How grateful I am for a loving daughter that reminded me of how great that change was.

And all those other tall and good looking flowers? Well, turns out they aren’t all those others that you think have it all together. They aren’t the Jones that you are chasing down. They aren’t the cashiers at the store looking down their noses at you. They are your family. Standing tall and proud of you. Because of you. Not in spite of you. Sometimes that new normal is not being weighed down low and wilting with the weight of life. If fact what you once thought was wilting was actually  bending-bending down low in thanks for a Heavenly Father who let you feel the weight of having eight little people love you so intensely. It’s a weight I am happy I get to feel each day.

5.02.2014

{ Our Playroom Makeover-Part 3 The Decorating }

In the series of things The Decorating came next, but in actuality after The Planning was under way, but before The Building even began, I had almost all of the things for the “decorating part” at least bought and they were being hid away in the attic and various other hiding spots throughout the house until Christmas. This was one of the funnest parts for me, and with the joys of online shopping it became so much easier.

I had drawn out a floor plan of the playroom and situated things how I thought they would work best. My idea was to create two separate areas-a “big kid” area and a “little kid” area. I was going to use two couches in the shape of an “L” along with a side table and sofa table to separate the areas. That “big kid” area would be where the TV is and a place for my older children to be able to have friends over to hang out and watch movies or play Wii. The “little kid” area would be the area under the two lofts where the play kitchen would be and a new dollhouse that I was making. There would be floor space there to get out toys from the toy closet and play. The two lofts would become space for big and little kids alike, but I had a feeling that Brooke, Erika, and Abby would claim one as the “Girls Loft”, and give Scott and Ryan the other loft for a “Boy’s Loft”. The built in desk area would serve for both coloring as well as working on the laptop doing homework.

This is the plan that I had originally came up with and served for a good starting point for me as I shopped for items. I wanted a nice neutral base with fun pops of color throughout it. I wanted it to look nice, but definitely kid friendly. I needed finishes that would take some abuse, items that would be functionally for storage, and be a place where my kids would feel at home. Here are some of my thoughts as I went through that process-hopefully I can come back and read this next time I do a room so I can see where I made some good purchases and where I should look for items.

image

I painted the walls a light gray color-and this part alone became a huge thorn in my side. All grays are not equal, and I knew that full well going into it. I had gotten a dozen different samples and painted them on large pieces of poster board and on the wall, and still didn’t get it right the first time. Light is a crazy thing, and I found out that in a room with such high ceilings  that the color looked different at the bottom than it did on the top part of the wall. Not to mention different on all four walls, and at different times of the day. The color that I finally went with (after I had already painted the entire room another color) was Benjamin Moore Wickham Gray color matched in Sherwin Williams paint. In one of the pictures from The Building post you can see where it meets the ceiling where we hadn’t cut in yet and see how yellow the previous color looked.

In my first plan I had thought that we would do a couch and a loveseat in there, but when I measured it out we had room for two couches and it gave us more seating. I looked at a few couches that I liked, but in the end decided on the Ektorp sofa from IKEA. I have struggled getting this couch for a LONG time, even before this playroom makeover ever was. I would try to find reviews online of what people thought, and it was a mixed pot for sure. Some loved it, some hated it. I had sat on it before and thought it was comfortable enough, and for us the price was right. Those Pottery Barn ones sure looked tempting, but at a third of the cost, the Ektorp was just too good to pass up. The other plus was that a new slip cover only runs me $50, so if the kids ruin it, it’s very affordable to replace. The Pottery Barn slipcovers cost almost as much as the IKEA couch. I needed to have a couch that would get a lot of abuse since it was mostly a kids area, and I wanted to not have to worry that they would be ruining a super expensive couch or slipcover. Many people that have come over have commented on why in the world I would get a white couch with so many kids. My answer-bleach and Oxiclean. These slipcovers are easy to throw in the wash and bleach and back to knew again. We have had them on since Christmas and they are just now starting to show some dirt so I think we are due for a wash. Every 4 months is not bad in my book. Also, we have a no food upstairs rule, which I know the kids break often since I am finding wrappers and crumbs up there, but overall there isn’t all the sticky fingers that we have down in the kitchen. With our front room couch I have to stay leather, but I felt like I could get away with at least washable slipcovers up there where I can somewhat stop the messy hands from getting up there. So far it has worked out pretty good.

image

Comfort wise I have been super happy with them. They aren’t the sink in type you would get with the Pottery Barn ones, but they are cozy. The seats are just firm enough that you feel like you don’t sink in so far you can’t get out, and the back cushions are really soft but don’t seem to lose their shape. I wondered why I had waited so long to make this purchase because they really are great. My only complaint would be that the white fabric seems to gather lint like crazy. I feel like I am always wanting to run a lint roller over it to get all the dust off. It was something I hadn’t anticipated, but definitely not a deal breaker for me. In October IKEA was running a sale for their IKEA Family members (a free program) so we ended up getting them for even cheaper. I drove the 2 hours up to Atlanta one Saturday and brought them both back in the van. We unloaded the huge boxes into our bedroom where they stayed under blankets until Mitch came at Thanksgiving to help us carry them upstairs.

Finding a sofa table to go behind one of the couches was next on my list. I was going to use a side table that we already had from downstairs that was a similar color to the media cabinet. I thought it would help carry the dark color to the other side of the room, and I already had it so for now it will work fine. For the other furniture in the room though I wanted to mix in some other wood tones. There was already a lot of white in there so even though I love white I stayed away from placing a white table backed right up to the white couch. Too much white. I finally had narrowed it down to these five:

I loved the color and texture of this one, but it felt a bit too adult for the space. I think something a bit more casual would fit our style and the room.

image

Benjamin Distressed Wood Console

I liked the more rustic/industrial feel of this one. It was simple and the wood was a lighter tone than the cabinet so that was good, but in the end I wasn’t that impressed with the reviews and pictures of it online.

image

Safavieh Dennis Console Table

This one was my favorite for awhile, but unfortunately was only sold in the UK, so getting it here was a major cost. I loved the lighter wood and the criss cross wood on the sides of it.

image

Occa Oak Savoy Console table

I decided that since the walls were a really light gray maybe I should be looking for something along those lines instead. I found this one that looked okay, but still just not exactly what I had in my head. I wanted something that had a bit more texture/wood feel to it, not just a painted piece.

image

Threshold Windham Console Table

I ended up finding this one and fell in love with it. Then I tried to find where to get it since it was sold out on the site that I had originally found it. After searching for several days I finally found it on wayfair.com and with free shipping. I loved the middle legs that separated the space a bit since I was planning on putting some baskets down there, and I loved the gray tones to it, but with still some wood texture. When it arrived it looked a bit different from the picture, but has ended up working great. It looks a little more brown toned instead of gray which I was initially disappointed about, but I loved the shape of it so well that I decided to keep it. When we got the whole room put together it looked great. The slight brown tone with the color of the TV cabinet and other furniture ended up being a perfect blend. The quality of the table itself it great, but the color is more of a painted surface glaze than a gray stain so it seems to show marks kind of easy on the top. Overall I am happy with it.

image

Bridgeport Console Table

My plan was to put a rug in front of the couches over in the TV area, just to unify the area more and bring in a little bit of pattern. I was really set on this chevron striped rug from Pottery Barn Kids, but when I went to see it in person the stripes were very cream colored instead of white. It was really just not what I had thought it would be. Note to self for the future-it’s worth it to go see something in person if at all possible before purchasing.

image

Chevron Wool Rug

I found this one at Rugsusa.com that was similar, and even though the gray color was a lot darker than I had planned I thought it would still look great, and actually might be nice to equal out all of the white in the room. It turned out matching the other hopscotch rug almost perfectly. The white chevron stripes in this one were still a bit cream colored, but not nearly as cream as the PBKids one. They had a killer Veterans day sale so I scored if for super cheap, with free shipping!

image

Rugs USA Quinta Indoor Outdoor Chevron Charcoal Rug

I found this rug from CB2 and just fell in love with it. It made the space seem so playful and definitely added the touch of fun that I wanted . I used a coupon, but in the end it was a splurge for the room. I figured I had saved a bunch in the couches with them being on sale that it was still in my budget.

image

Hopscotch Rug

I wanted a vintage type stool for the built in desk area, but was having a hard time finding one that wasn’t crazy expensive and was the right height. I ended up buying a chair that was totally different, hoping it would give a little modern edge to the room, but when we got it, I hated it. It wasn’t comfortable at all, and the metal bottom just looked kind of cheap-so back it went. It was missing the hardware to put it together, so since it was their fault, they shipped it back for 1/2 price. Yeah! I was glad that I had started shopping really early for things so that I had time to return things if I needed to and also avoided the holidays shipping rush.image

Wildon Home ® Hebron Adjustable Swivel Bar Stool

I thought I had looked everywhere, but while searching on worldmarket.com I came across just the stool that I had in mind. It looked sort of industrial/vintage and I thought it would work really great for a teen hangout. I caught it on a REALLY good furniture sale that they had and got free shipping again! Love free shipping! When it arrived I was shocked at how awesome this stool is. It is SO heavy, and the finish is more of a metal colored not just painted black. The top wood is also not shiny like it looks, but a great light weathered look and really heavy duty. I LOVE it! I am actually thinking of replacing our faux leather stools in the kitchen that have started to peel with these. The seat spins so it can be adjusted to the perfect height. It was funny to me that this is what I had in mind for the space, and I tried to go with other things, but in the end my gut was right and it is almost my most favorite piece in the room.

image

Twist Swivel Stool

I had seen these little kid wing back chairs on this blog-Natasha Smith Photography and thought that they would look so cute in the space. When I looked for them on Amazon they only had this light gray color, but I ordered them anyways hoping that they were the right ones. They were the darker gray like on the other blog, and were super cute, but I  didn’t love them. I held onto them while looking for something else, but some things that I didn’t like was that 1-they looked a little to serious for the space. Maybe for a cute reading spot in a library nook? and 2-the color looked a little too blue to me instead of dark gray.

image

I got a magazine one day form Home Decorations Collection and they had these cute kids chairs. They had a few colors and one was a dark gray color. I don’t know why the color online makes it look brown, but in the magazine it was definitely gray. They were having a sale (I love sales) and it ended up being not that much more than the ones that I had originally bought. Since the first ones had the color misadvertised they let me send them back for free! Yeah! When these chairs arrived, I was so impressed with the quality. I liked that the cushions could be turned over (something the first chairs couldn’t do), and the feet were real wood not plastic like the other ones. And the fabric at amazing-it is heavy duty and has an almost linen texture to it. I wished they had bigger ones for me-they are so cute! The simply shape works so much better in the space.

Kids Mirage Chair

image

Jody Kid's Chair

The Moroccan poufs were the one thing that I thought would bring a great deal of color to the space, and a place to prop our feet since I wasn’t going to have a coffee table up there. The problem is that they are CRAZY expensive in my book. I looked everywhere for them, but for four of them it was going to break my budget. I looked into sewing them, but in the end just couldn’t make it work. I am in love with the bright pink and blue one, but one crazy thought that I had since they are real leather and dyed was that I worried about the colors bleeding onto my rug up there. I wonder if that is a problem with them. I ended up going with some other colorful floor pillows, and maybe in the future I will splurge and get one of the poufs-they just look so pretty.

image 

The chalkboard word find I ended up making from a tutorial here:Thistlewood Farms-Chalkboard Word Find.

image

A lot of the other items where pillows from various places, wall art, and some great accessories. I used the 9 cubby white bookshelf to make a new dollhouse of sorts for their old dollhouse furniture, and my plan was to paint our pink play kitchen set white. My little boys play with it a lot more now than the three girls do so I wanted it to be a bit more masculine, but I just ran out of time, so it’s still pink as of now. Hopefully as the weather warms up consistently I can get out in the garage and spray paint it one afternoon.

I mentioned before in my planning for the playroom that I had figured out the “Right Way” to decorate. The “Right Way” for me was this-to make out a very detailed plan to start from. No matter what the space is or how big or small my budget is-MAKE A PLAN. In the past I will see something that I think might look nice in a certain room or I think I like it but don’t have a specific place in mind and what I end up with is just a bunch of stuff that doesn’t really blend together very well. There has been those occasions when I find something I just love and know I will find a place for-but for me those times are much fewer. I need a plan of what colors will work and what specific furniture I might need or not need. From there it has been so much easier for me to stay focused on the whole picture. Using an idea board like I did for this space let me see all of the possible items together and how they may look. It’s easy to swap out a picture or two and switch around different colors schemes instead of having to buy and return multiple items.

On Christmas Eve as we were pulling things out of the attic and finally getting to place them in the actual playroom, it felt so good to see that my vision for the room was finally coming together. It turned out fun and playful-and I just hoped the kids would love it as much as I did and get to enjoy making many happy family memories there.

4.30.2014

{ Our Playroom Makeover-Part 2 The Building }

After all of The Planning, I was ready to get started building on these lofts. I had draw out the plans, including exactly how much wood I would need for each step of the way and had purchased the first amount of wood. My brother Mitch was going to be here visiting for Thanksgiving weekend so my goal was to have the lofts rough box shape attached to the walls by the time he left. That gave us about 3 day to work on it. I did an awful lot of research on how to build these lofts. After looking at multiple plans and about a thousand pictures of different styles of railings and stairs and the ceilings for underneath, I came up with a set of plans that would be best for us. In the end I am not sure it’s the “right way”, but it seemed to be an engineeringly sound way, a way that gave it the best amount of safety you could have for a loft, and was the way that we intended it to look aesthetically. I was a little frustrated when I was looking for plans at the lack of detailed instructions on how to go about this, so I decided that I better write down the way that I did it, so if I ever what to try to attempt this again I will have some detailed instructions to remind me.

We started by officially closing down the playroom. When the kids all came home from school one day, the playroom was officially closed until Christmas. We put up wrapping paper covering the French doors on both sides of the door and then hung a sheet for extra protection from any little kid sized invaders. They were super curious but didn’t peek. We had moved the TV out to the hallway media area just outside the door so they wouldn’t have to miss out on all our Christmas time movies, and were in earshot as I would be working some days. We would rotate out the toys to play with in the hallway area, and then they would knock when they wanted more. It’s funny how after a month of doing that  it became such a smooth working system you would of thought that’s how it was always done. It’s makes me laugh now to have been a fly on the wall watching all that craziness.

Materials for Step 1

4-2x8 8ft in length

2-2x8 12ft in length cut in half for a total of four pieces

6-2x4 10ft in length cut in half for a total of 12 pieces that would go inside of the outer “box” we made

1 box (100 count)-4inch lag bolts to attach 2x8’s and 2x4’s together and attach the loft to the wall. We used 64 total for this step for both lofts-8 for the corners and 24 for attaching the 2x4’s.

Step 1-Building the loft base

For the first part of this project I started by attaching together the 2x8’s to make a basic box shape. I used two lag bolts per corner to attach them together. After I had finished one of the boxes I realized a mistake I had already made. I knew that I wanted to add some trim around the outer edges later (you can see it on one of the later pictures), but I had not countersunk the screws so that the trim would lay flat on it. I tried to unscrew them, but they were in too tight. The ones that would eventually be facing the wall wouldn’t be a problem, but the outer two sides I would have to adjust on the trim later to make it fit.

Playroom Building-2

When I made the second box I made sure that I used a large 1inch paddle bit to drill a countersunk hole first that went down just enough for the head of the lag screw to be flush with the wood, and then used a regular sized bit to drill all of the way through the rest of the wood. After I had both boxes assembled I was ready to fit the 2x4’s inside of the box to give it more support. I had planned for there to be six supports in each box. As I researched what a normal spacing of floor joists were, and how big our lofts were, six seamed to be a good amount. I’m sure by some standards it was overkill-I think many things we ended up doing were, but we didn’t want to take any chances of it not being sturdy enough to hold a good amount of weight. I used the same 4inch bolts to attach the 2x4’s to the main frame. My brother asked why I didn’t just use wood screws to attach these. On some plans that I had found they had all used the bolts for the main frame and the 2x4’s as well. I basically just went with their plans and figured extra strength was probably not a bad thing. It was more expensive for the lag bolts as opposed to just wood screws, but for a project this big it was small change to pay for safety.I finished up almost all of this part of the building by Wednesday night, and then our drill burnt out. It was one that we had had for almost 10 years so it had gotten some good use, but we were left with no tools to use all of Thanksgiving the next day. It was probably for the better-we were able to just spend a whole day relaxing and talking and eating.

The kids think it’s funny in the picture above that Aaron is just watching me do all the work. Truth be told I LOVE doing all the work. I don’t get too much time to do anything that “hobbylike” for me, so when I have a chance to I get a little bossy and stingy with the work. It really is so relaxing for me to create things, and I love just having Aaron there to keep me company though he claims that I never let him watch me do anything. He may be partly right =) He and Mitch just let me do my thing, and helped with their muscle power when I needed it. In the end we were all super glad that we were all there-there was something that we each had overlooked at one time or another, so it turned out we were a pretty good team. Aaron just humored me and let me do the power tool part and he did the engineering part, and Mitch-well he did all the scary parts like getting under the loft to screw in bolts to the wall when Aaron and I were too chicken too. Thanks Mitch, you’re our hero=). He also helped Aaron with all the heavy lifting a 7 month pregnant woman can’t do (though I tried hard because I really don’t like to ask for help), and helped us think though all our plans thoroughly. And really most importantly he and Aaron kept me company while I had a little building fun.

Materials for Step 2

4-4x8ft plywood 19/32inch thick cut down to size

2 1/2 inch wood screws (2 boxes)-to attach the plywood to the base

Playroom Building-13

Step 2-Attaching the plywood floor

We had big plans for going out early on Friday morning to try and hit some Black Friday deals and score ourselves a new drill, and Mitch wanted a sander to finish a project he was working on too (it’s by the bed that Aaron is sitting on in the picture above). We ended up staying up way too late talking though so when our alarms went off at 6am, we promptly both decided to snooze them indefinitely. I did want a little vacation too and sleeping in doesn’t happen too often around here. Mitch got up earlier than me on Friday and picked up a new drill for us along with his sander and some materials for his project.

I continued to finish attaching the 2x4’s and then we flipped over each box so we could attach the plywood to the top. We had assembled the boxes upside down so that we could lay the 2x4’s flush at the bottom (we laid it on a scrap piece of wood so we wouldn’t get carpet stuck in between the wood) rather than having to hold the 2x4’s up at the top of the box while screwing them in and hope that they would all be even. We don’t own a circular saw, so had Lowe’s cut down the plywood sheets to size for us. I waited to go buy the plywood until I was finished with Step 1 so that I could measure one more time and get the measured exact. I had figured out the measurements on paper, but after having the actual wood together I wanted to be sure that our dimensions were accurate with the slight differences that wood sometimes has in it. We attached the plywood with 2 1/2inch screws around the edge every foot or so and then a couple into each crossways 2x4. In the picture above you can see where we ended up having to add some 2x4 pieces cut shorter so that where the two pieces of plywood met they would have something to be screwed down into.

Materials for Step 3

2-4x4 8ft in length for corner support of loft

6-2x4 8ft in length to help support the loft as we lifted it up and screwed it into the wall. We ended up using these for later in the project so they were not a waste.

39-4inch lag bolts. We ended up having to go purchase a few more bolts than the initial 100 pack after seeing exactly how many we would need to attach the lofts into the wall.

Step 3-Attaching the loft to the wall

The next step was by far the hardest part of this whole thing and the one that I was super worried about. I think I had dreams of our whole house collapsing because we had attached these lofts into the studs and they broke them and the playroom started crumbling down. Crazy, I know. Almost every single loft I found online was solely supported by one pole on one side, with the rest of the loft securely attached to the wall. It was what set apart the lofts that looked built in and those that looked a little “homemade” for that lack of a better word. I wanted our loft to look like it was part of the house when we had it built. Our best option for the one leg wonder was a 4x4 pole. Our selection of this 4x4 is one thing I would do differently in the future. Those that had used a pressure treated 4x4 (which is all we could find) had mentioned that over time as it dried it could warp a bit and end up twisted a little. We didn’t really have a better option because we couldn’t find any regular 4x4’s at any place in town, but after we added the additional square column around it and it has had a few months to really dry out, I have noticed that one of the poles looks a little crooked and the other pole had a screw that seems to be popping out as the 4x4 is twisting. Live and learn I guess. I’m sure no one would notice but me, but it’s enough that next time I would do it different. When I think of how heavy that loft was to lift up, it’s amazing that just one pole can support it, but it does.

One thing that I am glad that I did when we built our house was to take pictures of almost all of the rooms before it was dry walled. Why I did that, at the time I wasn’t sure, but I was sure that it would come in handy later for something. This time it proved to be right. We were able to look at the pictures and figure out exactly where the studs were. With something as heavy as these, I wanted to make sure we weren’t just guessing where we thought the studs were, we needed them to be in the middle of the studs. We lucked out and above the toy closet was a header so along the whole length where we needed to bolt the loft into we knew was in a solid piece of wood. The other studs we were able to locate through the picture and from the attic above. We ended up putting in 19 bolts on this toy closet side loft. Overkill maybe, but secure for sure. We have had around 500lbs of teenagers up there before and not a budge. Now, I’m sure if they decided to jump up and down on it that may be another story, but for now after four months it’s not going anywhere.

Playroom framing-4

The other loft didn’t have a header, but we were able to find all of the studs and put 20 lag bolts into studs to secure it. I was just so grateful for those pictures-it saved us a ton of time locating studs and gave me a lot of piece of mind knowing that those things were attached absolutely secure.

Playroom framing-5

Here are a few pictures after they were attached to the walls. Hopefully I can explain how we got them there somewhat clearly. We laid the boxes on their side with the plywood side facing the wall. We attached the 4x4 permanent piece of wood with 5 lag bolts. Two from each side being careful to avoid the bolts that were already in there holding the box together, and one lag bolt down through the top. After that we attached two 2x4’s that were 8ft in length together temporarily with wood screws to make them be temporary poles for the three other corners. All of this was done while the box was on it’s side. The next part was a bit of trial and error. In hindsight we should have probably rallied some more help, but as three independent people we thought we could do it ourselves. The second loft was so much easier after a little practice on the first one. This is what ended up working-Aaron and Mitch each took a corner that was nearest to the wall and started to lift it up in the air. I was at the two corners that were closest to the French doors. I would run between the two corners and scoot in the 2x4’s and 4x4 as they would lift up. If the 2x4’s just drug along they would start to bend and break at where they were secured to the loft. Once we had the loft set in the corner the weight of it almost kept it tight against the wall-I think that is probably why from an engineering stand point this design of one major post and the rest of the loft secured to the wall works. We were then able to use the 4inch lag screws and attach each loft to the wall. The one on the left took 20 bolts and the one on the right took 19-overkill maybe, but we were glad we had studs available and could secure it so well.
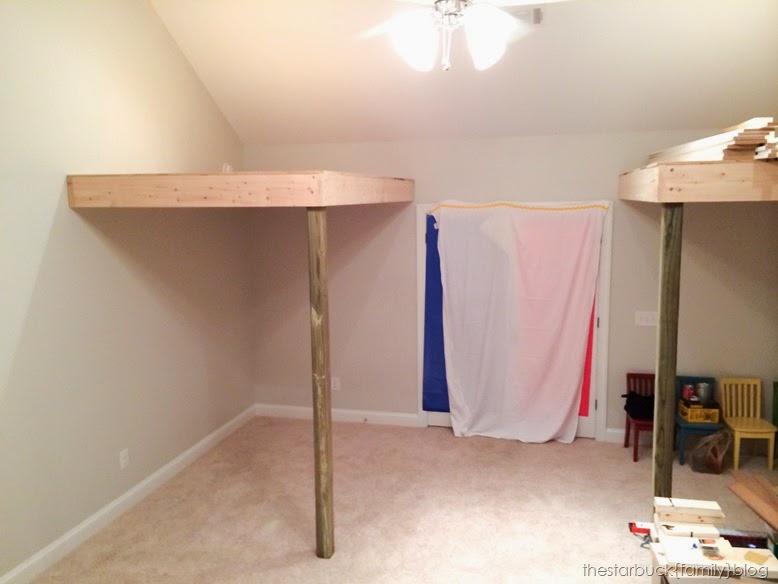
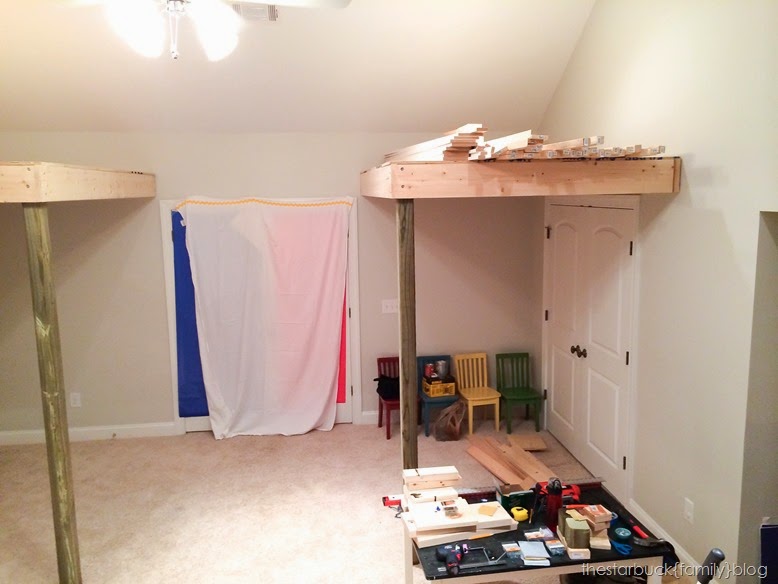
Playroom Building-3

Playroom Building-4

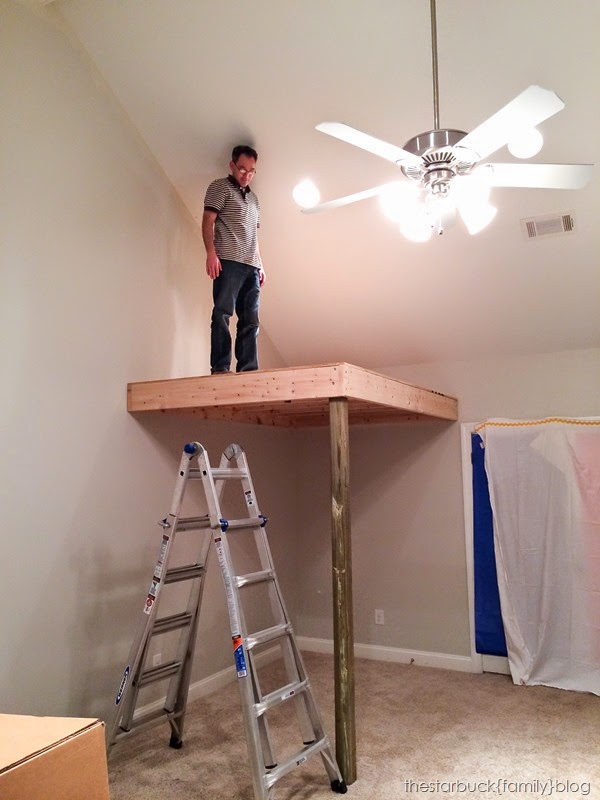
Aaron testing it out-once we were up there we realized how tall it really was-without the railing it was a little bit scary. I began to doubt if my kids would even want to go up there, but at this point it was a little too late to turn back. Luckily, once we got the railing built and attached it didn’t seem scary-still high enough up to seem pretty cool, but not as scary. You can get an idea of the head room available up there. It’s not a ton for an adult standing straight up, but for kids and teenagers it works great.
Playroom Building-6

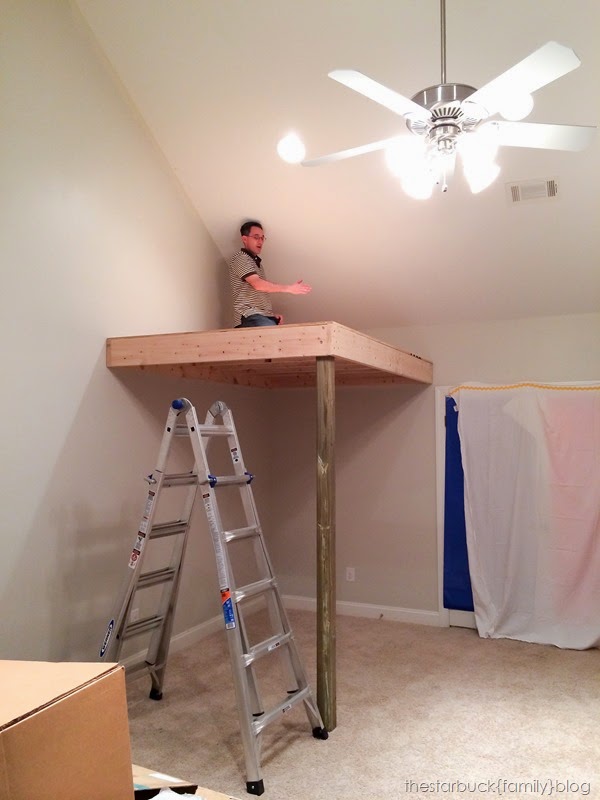
Aaron working his mathematical magic while he explains something to us about the set up up there. I was happy to have both lofts officially attached to the walls by the end of the weekend. After that I knew that I would be able to finish the rest by myself with Aaron’s help for a few things. It felt so good to have what looked like two lofts in the works. I was pretty proud of us and what we had accomplished so far. At this point the kids obviously knew that we were building something for their surprise because we were just so loud with all of the tools. It still amazes me though that they didn’t try to come in and peak at what we were making-even the little boys. When the cousins arrived a few days before Christmas they even announced that they couldn’t come in because there were Christmas presents in there.
Playroom Building-9

Materials for Step 4

8-1x5 1/2inch primed white boards 8ft in length for columns

8-1x1 1/2inch primed white boards for trim around edges of loft

1-1x2 1/2inch primed white board for trim

1-1x4 board for trim around the top of columns

1-1x7inch primed white boards for trim along bottom of column

Other trim pieces for around column bottom and around edge of ceiling planking

2inch screws (50 count/1box)-used to screw the column together

Step 4-Building columns and attaching planking for ceiling underneath the loft

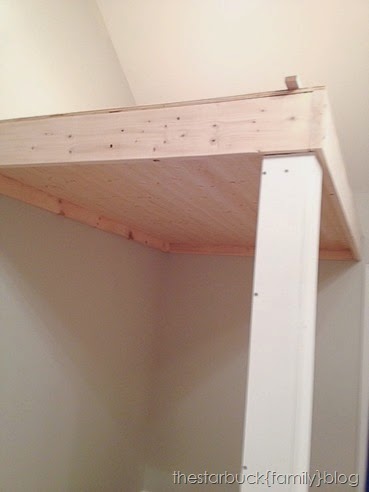
I knew that there were several things that we would need to rent a nail gun for. I tried to get things to a point where we would have to only rent it for one day. We needed it to attach the plank ceiling to the underside of the loft and to attach the trim around the poles and edges of the loft. I spent Monday building the two columns that would surround the 4x4’s of each loft. It would offer a bit more support and mimic in part all the molding that is in the rest of our house. I wanted these lofts to look as if there were part of the original house and I love how the columns turned out. I used the preprimed boards to create a box and then simply attached it to the 4x4 on two sides.

  Playroom Building-14Playroom Building-16 

For the trim I just attached various widths of primed 1x2’s and other trim molding. In the spots where I wasn’t able to countersink in the bolts when I attached the box frame together, I had to use a countersink bit and basically carve out the back of the piece of molding so it would lay flat. I wanted the underside of the loft to have a very finished look to it, so we found some tongue and grove planking at Lowes. They came 8? to a pack, and we ended up using exactly 3 packs per loft-six packs total. They were pretty easy to install, but it was definitely a two person job-so Aaron was happy when I actually let him help=). I would cut the boards to length and help hold while he would nail them in. I found a tutorial after the fact that shot the nail in at an angle right through the grove so that they wouldn’t have to fill so many nail holes. We had shot right through the top which turned out to be hundreds of nail holes to fill and sand. Great tip for next time though. One other thing that I would do different was that we had the 2x4’s to attach the boards to in the middle area, but on the edges there wasn’t. They fit pretty snug, but it would have been a good idea on the shorter 5ft length ends to have attached a 1x2 strip of wood so that we would have something at each end of the planks to secure it to-hopefully that makes sense. I loved how nice everything looked once the planks were up and the poles were finished out with molding. I put some molding around the edges of the planking so that it had a nice finished edge and covered up any gaps that were left.

Materials for Step 5

4-2x4 10ft in length for the sides of both ladders. I had originally thought I could use the 2x4’s we had purchased and used for extra support as we were attaching the loft to the wall, but hadn’t thought through that one good enough and realized with the angle that the ladder needed to be we would need ones that were slightly longer than 8ft

2-1x4 8ft in length for ladder rungs

2 1/2 inch screws (2 boxes)-to assembling ladder together and for the railings

Step 5-Building the loft ladders

Building the ladders was next. We used the 2x4’s at the 10ft length and cut them at angles on the top and bottom. We then used 1x4’s for the rungs of the ladders cut to 16inches wide. We bolted them to the loft from the back with the same 4inch lag bolts that we used for the rest of the loft. I ended up going back and covering up with wood filler all the other bolts, but I did leave the ladder ones exposed in case we needed to replace the ladders because of it braking. I attached the rungs with wood screws, but if I would do it again ( I may go back and redue this since I can unbolt the ladder) is to make a routered cut at each place that a rung is so the rung can slide into the 2x4 and then wood glue and screw it in. I think it will make for a much stronger ladder. We haven’t had too many problems, but we have had one rung break already that I need to replace. It had a little too much weight on it and I didn’t pre drill the holes so it created the wood to crack more easily.

Playroom Building-17

Materials for Step 6

8-1x4 8ft in length for railing top and bottom

20-2x2 8ft in length for railing spindles. Each pieces was cut down into 3 pieces for a total of about 60 pieces that were each 31inch in length. I cut them as I went along and ended up being able to return a few that we didn’t use.

Left over 2x4’s for newel posts

2 1/2 inch screws for attaching the posts to railing and railing to the plywood loft floor

Step 6-Building the railing

The railing was the last part of the building that needed to be done, and it took probably the longest because of all the angles. I don’t have a lot of pictures but when you see the final pictures you can see how the side railings all came together. I built two boxes that became the larger newel posts at the top of the ladder. We set them farther apart than the 16inch rung width just to give a little extra room when climbing up-a suggestion from Aaron that was much needed. It made a big difference in climbing in and out comfortably. The 1x4 on the front of the post was cut a little longer so that it overlapped the loft floor and we would be able to screw it into the front of the loft. I cut the remaining spindles to 31 inches and then sanded each one down individually to make them extra smooth. We basically used our staircase in our home as a model for how tall to make the railing and how far apart to place the spindles. I am not sure how lofts are treated during a home inspection, but we wanted to make sure that they were at least equal to our staircase should we ever move and they needed to be a specific height. That of course was second to just having it really high so that my little kids wouldn’t fall-something I worried about, but they really play so carefully up there and we are up in the playroom when the little boys play up there just to be extra careful. Getting the railing fitted against the ceiling on the side railings was the trickiest part. I basically had to make the entire railing and then slide it into place. It was super tricky and a tight fit. The top and bottom of the railing is made from 1x4’s and the spindles are 2x2’s that are predrilled and then screwed in from the bottom 1x4. That 1x4 was then screwed into the plywood loft base. We connected the top and bottom railing parts at the corners with flat metal plates on the underside and top of the railings. The railing is also screwed into studs at both sides. The picture below is when just the front railing was installed, I don’t have a before picture of the side railing before it was painted.
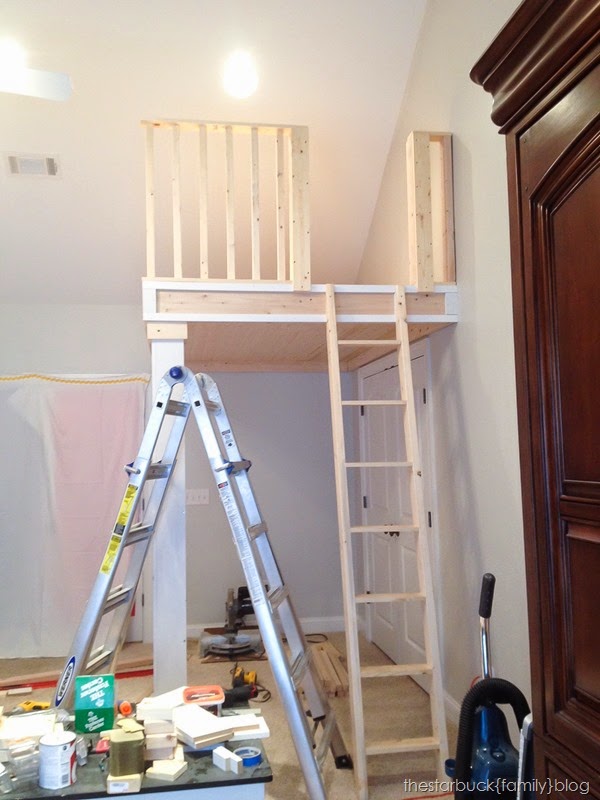
Playroom Building-18

Step 7-1000-Sanding and Painting

Okay so there wasn't that many more steps, but what was left was a lot of filling holes, sanding, caulking, painting with a primer, sanding again, wiping down and vacuuming everything really good, and then painting it a glossy white paint. It felt like about a thousand steps because it took so long. I was still painting up until the few hours before Christmas. I actually still need to go back and do another coat in some spots. Those railing spindles and ladder rungs took forever to paint, but in the end I was super happy with how it turned out. I still can’t quite believe that we built this. Aaron and I would just stand up there looking at it saying, “This is SO cool!” I am pretty sure that we were building this in part for ourselves as well to satisfy some childhood dream. Either way, it turned out pretty great, and come Christmas morning the kids were beside themselves with excitement.